AIWA CX-NHMT75 Operating Instructions - Page 10
Graphic Equalizer - remote
 |
View all AIWA CX-NHMT75 manuals
Add to My Manuals
Save this manual to your list of manuals |
Page 10 highlights
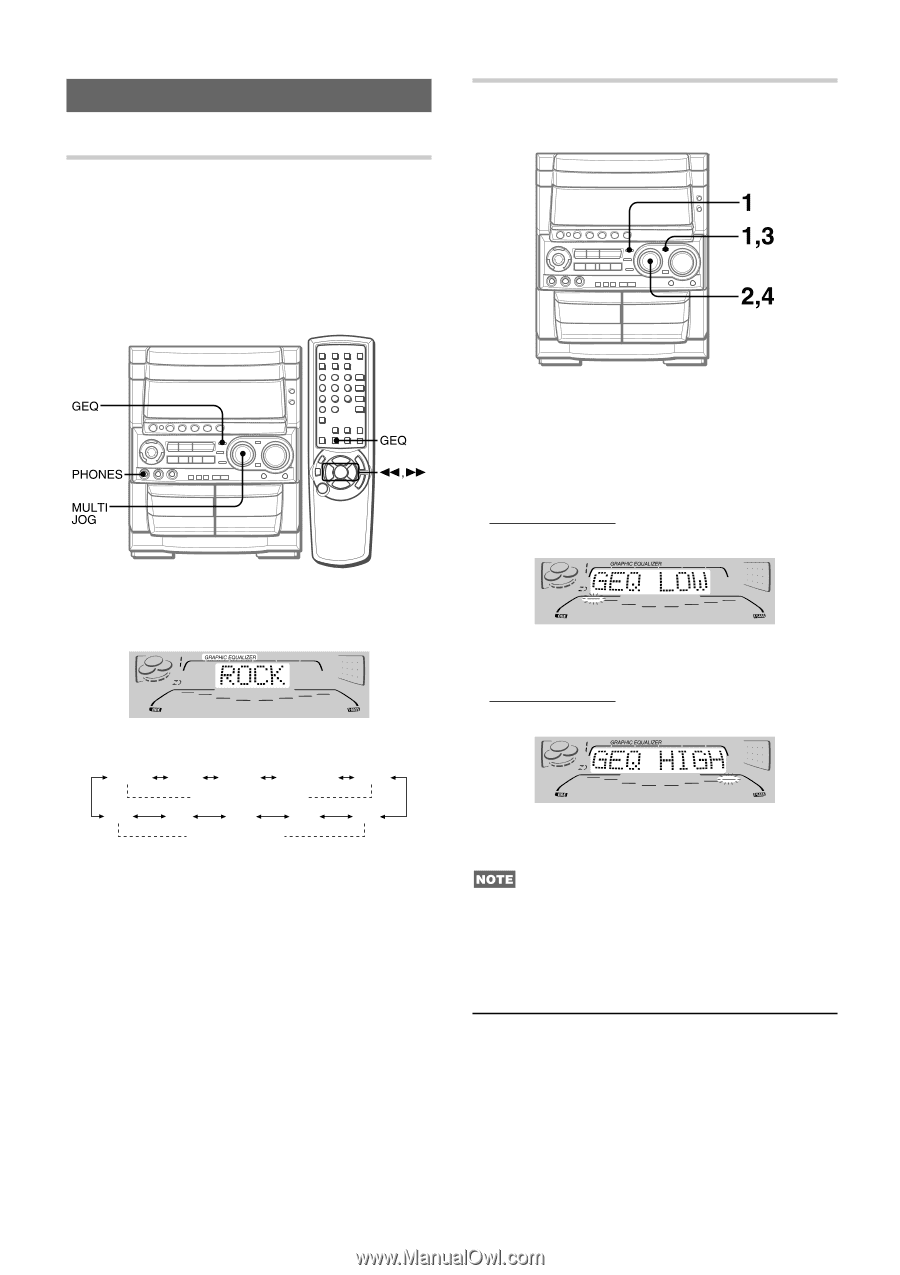
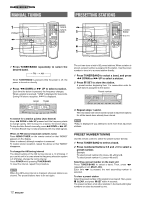
GRAPHIC EQUALIZER SETTING A NEW EQUALIZATION CURVE MANUALLY SELECTING THE PROGRAMMED EQUALIZATION CURVE This unit provides the following 5 different programmed equalization curves. ROCK: Powerful sound emphasizing treble and bass POP: More presence in the vocals and midrange LATIN: Accented higher frequencies for latin music. CLASSIC: Enriched sound with heavy bass and fine treble. JAZZ: Accented lower frequencies for jazz-type music The equalization curve can be customized to suit your preference. 1 Press GEQ, followed by ENTER within 4 seconds. Your customized setting will be based on the currently selected curve. To select a different curve to work on, turn MULTI JOG before pressing ENTER. The display will be switched to read "GEQ LOW." 2 Within 8 seconds, turn MULTI JOG to adjust the level of the lowest frequency. Press GEQ, and turn MULTI JOG to select one of the programmed equalization curves within 4 seconds. "GRAPHIC EQUALIZER" appears and the GEQ mode is displayed cyclically as follows. ROCK POP LATIN CLASSIC JAZZ Programmed mode M5 M4 M3 M2 M1 Manual mode To display the current GEQ mode Press GEQ. The current mode is displayed for 4 seconds. To cancel the selected mode Press GEQ twice. "GEQ OFF" appears and "GRAPHIC EQUALIZER" disappears. To select with the remote control Press GEQ, and within 4 seconds press for g repeatedly. The GEQ mode is displayed cyclically as above. 10 ENGLISH 3 Press ENTER to let "GEQ HIGH" show. The highest level frequency indicator flashes for 8 seconds. 4 Within 8 seconds, turn MULTI JOG to adjust the level of the highest frequency. The frequency level indicators of between the lowest and the highest are adjusted accordingly. If you do not store your customized equalization curve, it will be lost when you switch to a different curve or press GEQ. To store the new curve, see below. Using the headphones Connect headphones to the PHONES jack with a standard stereo plug (ø6.3 mm, 1/4 inch). No sound is output from the speakers while the headphones are plugged in. • When the headphones are plugged in, the DSP SURROUND system, the DOLBY PRO LOGIC and the 5.1 CH (page 29) do not function. Sound adjustment during recording The VOLUME control has no effect on recording, while the BBE affects recording.
-
 1
1 -
2
-
3
-
4
-
 5
5 -
 6
6 -
 7
7 -
 8
8 -
 9
9 -
 10
10 -
 11
11 -
 12
12 -
 13
13 -
 14
14 -
 15
15 -
16
-
17
-
18
-
19
-
20
-
21
-
22
-
23
-
24
-
25
-
26
-
27
-
28
-
29
-
30
-
31
-
32
-
33
-
34
-
35
-
36
-
37
-
38
-
39
-
40
-
41
-
42
-
43
-
44
-
45
-
46
-
47
-
48
-
49
-
50
-
51
-
52
-
53
-
54
-
55
-
56
-
57
-
58
-
59
-
60
-
61
-
62
-
63
-
64
-
65
-
66
-
67
-
68
-
69
-
70
-
71
-
72
-
73
-
74
-
75
-
76
-
77
-
78
-
79
-
80
-
81
-
82
-
83
-
84
-
85
-
86
-
87
-
88
-
89
-
90
-
91
-
92
 |
 |