Acer C112 User Manual - Page 23
Adjusting the Projected Image, Adjusting the Height of the Projected Image
 |
View all Acer C112 manuals
Add to My Manuals
Save this manual to your list of manuals |
Page 23 highlights
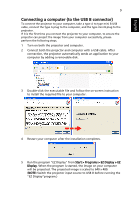
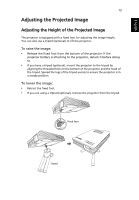
English 13 Adjusting the Projected Image Adjusting the Height of the Projected Image The projector is equipped with a fixed foot for adjusting the image height. You can also use a tripod (optional) to lift the projector. To raise the image: • Release the fixed foot from the bottom of the projector. If the projector battery is attaching to the projector, detach it before doing so. • If you have a tripod (optional), mount the projector to the tripod by aligning the threaded hole on the bottom of the projector and the head of the tripod. Spread the legs of the tripod evenly to ensure the projector is in a steady position. To lower the image: • Retract the fixed foot. • If you are using a tripod (optional), remove the projector from the tripod. Fixed foot Tripod
-
 1
1 -
2
-
3
-
4
-
5
-
6
-
7
-
8
-
9
-
10
-
11
-
12
-
13
-
14
-
15
-
16
-
17
-
 18
18 -
 19
19 -
 20
20 -
 21
21 -
 22
22 -
 23
23 -
 24
24 -
 25
25 -
 26
26 -
 27
27 -
 28
28 -
29
-
30
-
31
-
32
-
33
-
34
-
35
-
36
-
37
-
38
 |
 |