Acer C112 User Manual - Page 29
Appendices, Troubleshooting
 |
View all Acer C112 manuals
Add to My Manuals
Save this manual to your list of manuals |
Page 29 highlights
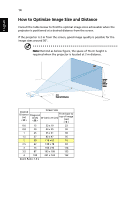
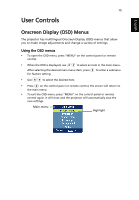
19 Appendices English Troubleshooting If you experience a problem with your Acer projector, refer to the following troubleshooting guide. If the problem persists, please contact your local reseller or service center. # Problem Solution 1 No image appears • Make sure all the cables are correctly connected as onscreen described in the "Getting Started" section. • Ensure none of the connector pins are bent or broken. • Make sure the projector is switched on. 2 Image is out of focus • Adjusts the focus ring on the projector lens. • Make sure the projection screen is within the required distance of 1.92 to 12.8 feet (0.6 to 4 meters). Refer to the "How to Optimize Image Size and Distance" section for more information. 3 Image is too small • Move the projector closer to or further from the or too large screen. • Press "MENU" on the control panel or remote control. Go to "Aspect Ratio" and try different settings. 4 Image has slanted • If possible, reposition the projector so that it is sides centered on the screen and below the bottom of the screen. 5 Image is reversed • Select "Projection" on the OSD and adjust the projection direction. 6 The projector • If possible, turn off the projector, then unplug the stops responding power cord and wait at least 30 seconds before to all controls reconnecting power.
-
 1
1 -
2
-
3
-
4
-
5
-
6
-
7
-
8
-
9
-
10
-
11
-
12
-
13
-
14
-
15
-
16
-
17
-
18
-
19
-
20
-
21
-
22
-
23
-
 24
24 -
 25
25 -
 26
26 -
 27
27 -
 28
28 -
 29
29 -
 30
30 -
 31
31 -
 32
32 -
 33
33 -
 34
34 -
35
-
36
-
37
-
38
 |
 |