Adobe 65015459 Server Guide - Page 29
The default location is: C:/Program Files/Macromedia/Contribute Publishing Server
 |
UPC - 883919159980
View all Adobe 65015459 manuals
Add to My Manuals
Save this manual to your list of manuals |
Page 29 highlights
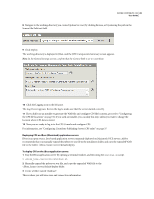
ADOBE CONTRIBUTE CS3 26 User Guide To use the CPS installer to generate a WAR file (Windows): 1 Download the installer. 2 Double-click the file to start the installer. 3 Read and accept the license agreement to continue with the installation. 4 In the Installation Method window, select the WAR file option. 5 Accept the default installation location or click Choose to select another location. The default location is: C:/Program Files/Macromedia/Contribute Publishing Server 6 When prompted, enter an administrative password to restrict access to the CPS Console. This is not the same password used to protect the Contribute administrator role, so you might want to make a note of it. 7 Click Close when you finish viewing the Summary screen. The installer creates a directory structure that includes a WAR file and associated data files. 8 Now you are ready to deploy the WAR file. For information, see "Deploying the WAR file" on page 26. To use the CPS installer to generate a WAR file (UNIX): 1 Download the installation file. 2 At the command prompt, enter the following command to set execute permissions for the JRun installation shell script: chmod +x pubserver-linux.bin Note: If you installing on the Solaris platform, substitute solaris for linux in the command. 3 Enter the following command to run the JRun installation script: sh ./pubserver-linux.bin Note: If you installing on the Solaris platform, substitute solaris for linux in the command. The installer extracts the installation files, and then runs the install script. 4 View each screen of the license agreement, and then accept the agreement to continue with the installation. 5 In the Installation Method screen, select the WAR file option. 6 In the Installation Folder screen accept the default installation location or enter another location. 7 In the Administrator Password screen, enter an administrative password to restrict access to the CPS Console. This is not the same password used to protect the Contribute administrator role, so you might want to make a note of it. 8 Review the Summary screen, and then press Enter when you are ready to begin the installation. The installer creates a directory structure that includes a WAR file and associated data files. 9 Now you are ready to deploy the WAR file. For information, see "Deploying the WAR file" on page 26. Deploying the WAR file After you have the WAR file, you are ready to deploy it to your J2EE application server.
-
 1
1 -
2
-
3
-
4
-
5
-
6
-
7
-
8
-
9
-
10
-
11
-
12
-
13
-
14
-
15
-
16
-
17
-
18
-
19
-
20
-
21
-
22
-
23
-
 24
24 -
 25
25 -
 26
26 -
 27
27 -
 28
28 -
 29
29 -
 30
30 -
 31
31 -
 32
32 -
 33
33 -
 34
34 -
35
-
36
-
37
-
38
-
39
-
40
-
41
-
42
-
43
-
44
-
45
-
46
-
47
-
48
-
49
-
50
-
51
-
52
-
53
-
54
-
55
-
56
-
57
-
58
 |
 |
