Adobe 65015459 Server Guide - Page 31
For information, see Configuring Contribute Publishing Server CPS only
 |
UPC - 883919159980
View all Adobe 65015459 manuals
Add to My Manuals
Save this manual to your list of manuals |
Page 31 highlights
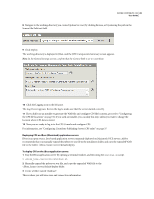
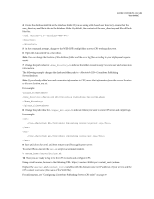
ADOBE CONTRIBUTE CS3 28 User Guide 8 Navigate to the working directory you created (pubserver-war) by clicking Browse, or by entering the path in the Source File Path text field. 9 Click Deploy. The working directory is deployed in JRun, and the J2EE Components Summary screen appears. Note: In the General Settings section, confirm that the Context Path is set to /contribute. 10 Click the Logging icon in the left pane. The Log Viewer appears. Review the log to make sure that the server started correctly. 11 If you didn't use an installer to generate the WAR file and configure CPS file locations, proceed to "Configuring the CPS file locations" on page 30; if you used an installer, you can skip this step, unless you want to change the location where CPS data is stored. 12 Now you are ready to log in to the CPS Console and configure CPS. For information, see "Configuring Contribute Publishing Server (CPS only)" on page 37. Deploying CPS on JBoss (Macintosh) application servers JBoss is an open source, Java-based application server commonly deployed on Macintosh OS X servers. Adobe recommends that you manually expand the pubserver.war file in the installation folder, and copy the expanded WAR file to the folder: /server/default/deploy. To deploy CPS on the JBoss application server: 1 Stop the JBoss application server by opening a terminal window, and executing the shutdown.sh script. % /server/bin/shutdown.sh 2 Manually expand the pubserver.war file, and copy the expanded WAR file to the /server/default/deploy folder. 3 Create a folder named "database". This is where you will store user and connection information.
-
 1
1 -
2
-
3
-
4
-
5
-
6
-
7
-
8
-
9
-
10
-
11
-
12
-
13
-
14
-
15
-
16
-
17
-
18
-
19
-
20
-
21
-
22
-
23
-
24
-
25
-
 26
26 -
 27
27 -
 28
28 -
 29
29 -
 30
30 -
 31
31 -
 32
32 -
 33
33 -
 34
34 -
 35
35 -
 36
36 -
37
-
38
-
39
-
40
-
41
-
42
-
43
-
44
-
45
-
46
-
47
-
48
-
49
-
50
-
51
-
52
-
53
-
54
-
55
-
56
-
57
-
58
 |
 |
