Alcatel OS6850-U24X Getting Started Guide - Page 13
Attaching the Switch to the Rack, Note., If you are installing multiple switches in a rack to form
 |
View all Alcatel OS6850-U24X manuals
Add to My Manuals
Save this manual to your list of manuals |
Page 13 highlights
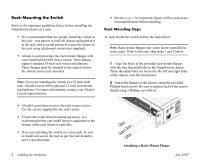
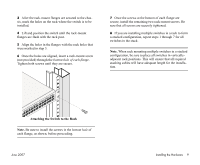
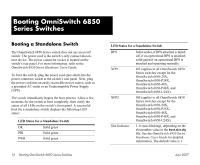
3 After the rack-mount flanges are secured to the chassis, mark the holes on the rack where the switch is to be installed. 4 Lift and position the switch until the rack-mount flanges are flush with the rack post. 5 Align the holes in the flanges with the rack holes that were marked in step 3. 6 Once the holes are aligned, insert a rack-mount screw (not provided) through the bottom hole of each flange. Tighten both screws until they are secure. 7 Once the screws at the bottom of each flange are secure, install the remaining two rack-mount screws. Be sure that all screws are securely tightened. 8 If you are installing multiple switches in a rack to form a stacked configuration, repeat steps 1 through 7 for all switches in the stack. Note. When rack mounting multiple switches in a stacked configuration, be sure to place all switches in verticallyadjacent rack positions. This will ensure that all required stacking cables will have adequate length for the installation. Attaching the Switch to the Rack Note. Be sure to install the screws in the bottom hole of each flange, as shown, before proceeding. June 2007 Installing the Hardware 9
-
 1
1 -
2
-
3
-
4
-
5
-
6
-
7
-
 8
8 -
 9
9 -
 10
10 -
 11
11 -
 12
12 -
 13
13 -
 14
14 -
 15
15 -
 16
16 -
 17
17 -
 18
18 -
19
-
20
-
21
-
22
-
23
-
24
-
25
-
26
-
27
-
28
-
29
-
30
-
31
-
32
-
33
-
34
 |
 |
