Alcatel OS6850-U24X Getting Started Guide - Page 7
Installing the Hardware, Items Required, Site Preparation, Environmental Requirements - 6850
 |
View all Alcatel OS6850-U24X manuals
Add to My Manuals
Save this manual to your list of manuals |
Page 7 highlights
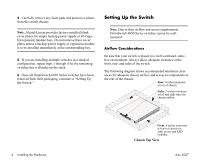
Installing the Hardware Items Required In addition to the materials and components provided in the OmniSwitch 6850 Series shipment, you must provide the following items in order to complete this installation: • Grounding wrist strap • Phillips screwdriver • Serial cable • Rack mount screws, if applicable Site Preparation Environmental Requirements OmniSwitch 6850 Series switches have the following environmental and airflow requirements: • The installation site must maintain a temperature between 0° and 45° Celsius (32° and 113° Fahrenheit) and not exceed 95 percent maximum humidity (noncondensing) at any time. • Be sure to allow adequate room for proper air ventilation and access at the front, back, and sides of the switch. No clearance is necessary at the top or bottom of the chassis. Refer to page 6 for minimum clearance requirements. Electrical Requirements OmniSwitch 6850 Series switches have the following general electrical requirements: • Each switch requires one grounded AC power source. • Grounded AC power source must be 110V for North American installations (220V international). • Each supplied AC power cord is approximately 2 meters (6.5 feet) long. Do not use extension cords. NEBS GR-1089 Compliance Requirements The following notes and warnings apply to all NEBS compliant platforms. Grounding requirements: To ground the equipment properly, connect a Panduit Corporation UL listed Lug, P/N: LCD8-10AL to the two threaded holes located on the rear of each chassis and power supply module. All connections should be made using 8AWG copper conductors. Use Panduit Corporation, P/N: CT-940CH for crimping. (Each Module must have its own grounding conductor.) (GR-1089 requires treatment of ground connections and painted surfaces as needed during installation.) June 2007 Installing the Hardware 3
-
 1
1 -
 2
2 -
 3
3 -
 4
4 -
 5
5 -
 6
6 -
 7
7 -
 8
8 -
 9
9 -
 10
10 -
 11
11 -
 12
12 -
13
-
14
-
15
-
16
-
17
-
18
-
19
-
20
-
21
-
22
-
23
-
24
-
25
-
26
-
27
-
28
-
29
-
30
-
31
-
32
-
33
-
34
 |
 |
