Alesis MultiMix 16 USB FX User Guide - Page 6
Rear Panel Features - usb mixer
 |
View all Alesis MultiMix 16 USB FX manuals
Add to My Manuals
Save this manual to your list of manuals |
Page 6 highlights
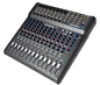
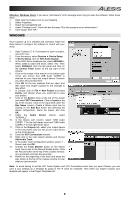
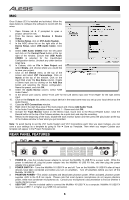
MAC Once Cubase LE 6 is installed and activated, follow the steps below to configure the software to record with the mixer. 1. Open Cubase LE 6. If prompted to open a project, cancel for now. 2. From the menus, select Devices Device Setup. 3. In Device Setup, click on VST Audio System. 4. In the ASIO driver list on the right side of the Device Setup, select USB Audio Codec. Click OK. 5. Select USB Audio CODEC from the left panel and click on the Control Panel button at the top right of the window. Ensure that USB Audio CODEC is selected for the Input/Output Configuration device. Uncheck any other devices listed here. 6. In Cubase, click on File New Project and select Empty, and choose where you would like to save your project. 7. Click on the Device menu at the top of the screen and select VST Connections. Click on Inputs at the top of the window. Click on the input titled under the Bus Name column. Create a Stereo input bus by clicking on the Add Bus button and selecting the Stereo configuration. Name the preset, and click OK. 8. Under the Audio Device column, select "USB Audio Codec". 9. In the Device port column, select "Front Left" for the Left stereo input and "Front Right" for the right stereo input. 10. Click on the Outputs tab, select your output device in the exact same way you set up your input device as the Audio Device. 11. Close the VST Connections window. 12. Right click in the dark blue area of the main project and choose Add Audio Track. 13. In the Audio Track Configuration window, select 1 - Stereo and click OK. 14. Activate the Track Monitor button on the Stereo track, found next to the Record Enable button. Click the Record button at the top of the Cubase window, do a quick test, and stop the recording. 15. Rewind to the beginning of the track, disable the track monitor button and then press the play button at the top of the Cubase window to hear what you just recorded. Note: To avoid having to set the VST Audio System and VST Connections each time you open Cubase, you can save a your settings as a template by going to File Save as Template. Then when you reopen Cubase your template will appear in the Project Templates list. REAR PANEL FEATURES 231 4 1. POWER IN - Use the included power adapter to connect the MultiMix 16 USB FX to a power outlet. While the power is switched off, plug the power adapter into the MultiMix 16 USB FX first, and then plug the power adapter into a power outlet. 2. POWER SWITCH - Turns the MultiMix 16 USB FX on and off. Turn on the MultiMix 16 USB FX after all input devices have been connected and before you turn on amplifiers. Turn off amplifiers before you turn off the MultiMix 16 USB FX. 3. PHANTOM POWER - This switch activates and deactivates phantom power. When activated, phantom power supplies +48V to the XLR mic inputs. Please note that most dynamic microphones do not require phantom power, while most condenser microphones do. Consult your microphone's documentation to find out whether it needs phantom power. 4. USB PORT - Use the included cable to connect the MultiMix 16 USB FX to a computer. MultiMix 16 USB FX requires a USB 1.1 or higher (e.g. USB 2.0) connection. 6
-
 1
1 -
 2
2 -
 3
3 -
 4
4 -
 5
5 -
 6
6 -
 7
7 -
 8
8 -
 9
9 -
 10
10 -
 11
11 -
 12
12 -
13
-
14
-
15
-
16
-
17
-
18
-
19
-
20
-
21
-
22
-
23
-
24
-
25
-
26
-
27
-
28
-
29
-
30
-
31
-
32
-
33
-
34
-
35
-
36
-
37
-
38
-
39
-
40
-
41
-
42
-
43
-
44
 |
 |
