Alesis MultiMix 16 USB FX User Guide - Page 8
Trks/usb To Monitor - multimix 16 usb 2 0 fx
 |
View all Alesis MultiMix 16 USB FX manuals
Add to My Manuals
Save this manual to your list of manuals |
Page 8 highlights
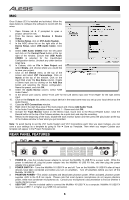
15. GUITAR SWITCH - When this switch is in the down position, Channel 8 will serve as a high-impedance input for connecting guitar or bass instruments. When the switch is in the up position, Channel 8 will accept mic or line-level signals. 16. GAIN - Adjusts the channel audio level (pre-fader and pre-EQ gain). Adjust this so that the PEAK LED just barely lights up during the Use standard 1/4" TRS (tip-ringsleeve) cables when connecting devices to the INSERT jacks. The signal is sent from the tip of the cable and returns on the ring. loudest parts of the song. 17. CHANNEL VOLUME - Adjusts the audio level on the channel. 18. MUTE - When this button is engaged, the channel's audio will be TRS (tip-ring-sleeve) TS (tip-sleeve) muted. 19. SOLO - When this button is engaged, the channel's audio will be sent to the MONITOR OUT and PHONES outputs. (This function will still work even when the channel is muted.) 20. PEAK LED - The LED will flash red if the signal is clipping. If this happens, decrease the setting of the GAIN knob or CHANNEL VOLUME knob. 21. CHANNEL PAN - Adjusts the (mono) channel's position in the stereo field. When recording to your computer, make sure the 2 TRKS/USB TO MAIN switch is in the up/raised position to avoid feedback in your recording. Alternately, you can deactivate the "software playthrough" function in your software while recording. 22. BALANCE (CH 9-16) - Adjusts the balance between Channels 9-16. 23. LO EQ (BASS) - Adjusts the low (bass) frequencies of the channel. 24. MID EQ - Adjusts the mid-range frequencies of the channel. 25. MID EQ FREQ - Adjusts the frequency that the CHANNEL EQ (MID) will boost or cut. For software monitoring capability when recording to your computer, make sure the MAIN TO MONITOR switch is disabled and the USB TO MONITOR switch is enabled. Then connect the Monitor outputs to speakers to hear the signal. 26. HI EQ (TREBLE) - Adjusts the high (treble) frequencies of the channel. 27. AUX PRE SEND - Adjusts the channel audio (pre-EQ) level that is sent to the AUX SEND output. You can use this to apply external effects to individual channels, or to create a custom monitor mix for yourself or your musicians. 28. FX SEND - Adjusts the channel audio level that is sent to MultiMix 16 USB FX's internal effects processor. Turn this up for the channels that you want internal effects applied to. 29. PREFADE - When this button is engaged, the FX Send signal can be controlled pre-fader. 30. EFFECTS SELECTOR - Selects the effect that MultiMix 16 USB FX's internal effects processor will apply to the various channels. Each channel can send different levels of audio to the processor by adjusting their FX POST SEND knobs. See the EFFECTS section for an explanation of the available effects. 31. AUX RETURN LEVEL - Adjusts the volume of the AUX RETURN INPUTS. 32. FX RETURN LEVEL - Adjusts the volume of the MultiMix 16 USB FX's internal effects processor. 33. LED METERS - Shows the audio level of the main mix. Turn the volume down if the CLIP LED lights up excessively. 34. 2 TRKS/USB TO MAIN - Routes the audio from your computer and the 2 TRACK INPUTS to the MAIN OUT. 35. 2 TRKS/USB TO MONITOR - Routes the audio from your computer and the 2 TRACK INPUTS to the MONITOR OUT and your headphones. 36. MAIN TO MONITOR - Routes the audio heard through the MAIN OUT to the MONITOR OUT and your headphones. 37. MAIN VOLUME - Adjusts the volume of the MAIN OUT. 38. MONITOR VOLUME - Adjusts the volume of the MONITOR OUT. 39. PHONES VOLUME - Adjusts the volume to your headphones. 8
-
 1
1 -
2
-
 3
3 -
 4
4 -
 5
5 -
 6
6 -
 7
7 -
 8
8 -
 9
9 -
 10
10 -
 11
11 -
 12
12 -
 13
13 -
14
-
15
-
16
-
17
-
18
-
19
-
20
-
21
-
22
-
23
-
24
-
25
-
26
-
27
-
28
-
29
-
30
-
31
-
32
-
33
-
34
-
35
-
36
-
37
-
38
-
39
-
40
-
41
-
42
-
43
-
44
 |
 |
