Alpine PXE-H650 User Guide - Page 11
MultEQ Calibration - test
 |
UPC - 793276310262
View all Alpine PXE-H650 manuals
Add to My Manuals
Save this manual to your list of manuals |
Page 11 highlights
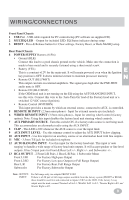
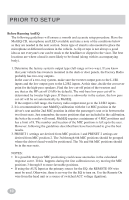
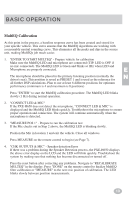
BASIC OPERATION MultEQ Calibration At this point in the process, a baseline response curve has been created and stored for your specific vehicle. This curve ensures that the MultEQ algorithms are working with a reasonably neutral sounding curve. This eliminates all the peaks and dips in the source unit, making MultEQs job much easier. 1. "ENTER TO START MULTEQ" - Prepare vehicle for calibration Make sure the MultEQ LED and microphone are connected (TIP: LED is OFF if no mic connected). The MultEQ LED is Green and blinks at 1Hz when LED and Microphone are properly connected. E The microphone should be placed in the primary listening position (normally the N driver's seat). This position is saved as PRESET 1 and is used as the reference for all further DSP calculations. Plan to use at least 6 different positions for optimum performance (minimum is 4 and maximum is 8 positions) Press "ENTER" to start the MultEQ calibration procedure. The MultEQ LED blinks slowly (1 Hz) during normal operation. 2. "CONNECT LED & MIC" If the PXE-H650 does not detect the microphone, "CONNECT LED & MIC" is displayed and the MultEQ LED blinks quickly. Troubleshoot the microphone to ensure proper operation and connection. The system will continue automatically when the microphone is detected. 3. "MEASURE POS 1" - Prepare to run the calibration test If the Mic checks out in Step 2 above, the MultEQ LED is blinking slowly. Position the Mic in location 1 and exit the vehicle. Close all windows. Press MEASURE on the remote control to begin (see Page 7). 4. "CHK OUTPUTS & MIC" - Speaker detection Error If there was a problem during the Speaker Detection process, the PXE-H650 displays the above error display on the LCD and the LED will blink quickly. Troubleshoot the system by making sure that nothing has become disconnected or turned off. Press the reset button after correcting any problems. Navigate to "RECALIBRATE MULTEQ" in the display. Press "DONE" on the remote control to finalize MultEQ filter calibration or "MEASURE" to the next mic position of calibration. The LED blinks slowly between position measurements. 13
-
 1
1 -
2
-
3
-
4
-
5
-
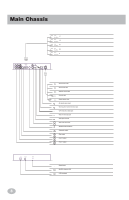 6
6 -
 7
7 -
 8
8 -
 9
9 -
 10
10 -
 11
11 -
 12
12 -
 13
13 -
 14
14 -
 15
15 -
 16
16 -
17
-
18
-
19
-
20
-
21
-
22
-
23
-
24
-
25
-
26
-
27
-
28
-
29
-
30
-
31
-
32
-
33
-
34
-
35
-
36
-
37
-
38
-
39
-
40
-
41
-
42
-
43
-
44
-
45
-
46
-
47
-
48
 |
 |