Alpine PXE-H650 User Guide - Page 9
Basic Operation - setup
 |
UPC - 793276310262
View all Alpine PXE-H650 manuals
Add to My Manuals
Save this manual to your list of manuals |
Page 9 highlights
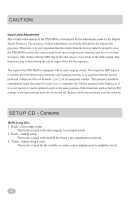
BASIC OPERATION Initial Setup & AntEQ Initially, a blank display is shown during sleep mode (before head unit powers up). 1. TURN ON Vehicle Ignition Switch 2. TURN ON Factory Radio Power and insert the H650 Setup CD. If properly connected, the Factory Radio Power should automatically turn ON the PXE-H650. The PXE-H650 display = "ALPINE PXE-H650" if already setup. E If this is the very first time the PXE-H650 is being used, the system will enter the SETUP mode automatically. When it does so, follow the steps below. If you don't N enter the setup mode automatically please refer to page 15 and FACTORY RESET. 3. Adjust Factory Head Unit. Head unit controls such as TONE, EQ or other special processing must be turned OFF. Set BALANCE and FADER controls to their center position. Make sure that the volume control on the factory head unit is set at about 2/3 to 3/4 of its maximum output. This will ensure that any automatic frequency compensation circuitry in the head unit is off. It also ensures that the output is not distorted but at a high enough level to provide a good signal for accurate processing to take place. The PXE-H650 utilizes an auto-ranging circuit for the Factory Head Unit input. This enables considerable flexibility in making output adjustments of the factory head unit. Once the level is set, the factory volume control (and others) should not be changed. Volume will be controlled through the PXE-H650 using the supplied remote control. Play Track 1, "Autorange Setup," of the Setup CD loaded in Step 2 above. 4. "ENTER TO SETUP" This is displayed when the PXE-H650 is Powered UP for the first time (or after a 'FACTORY RESET' is performed). Press "ENTER" to initiate SETUP sequence. SETUP continues with Auto Ranging level setting ("CHECKING INPUTS"). 5. "CHECKING INPUTS" - Checking and setting input levels from the head unit Before AntEQ begins analyzing the factory radio's output, proper signal levels are required. The Auto-ranging process is completed when "ENTER TO START ANTEQ" is displayed. Play Track 2, "AntEQ Setup", of the Setup CD loaded in Step 2 above. 6. "ENTER TO START ANTEQ" - Continue with AntEQ processing Press ENTER to continue to the AntEQ procedure. Whatever levels were set during auto-ranging are now used as the baseline response for AntEQ. 11
-
 1
1 -
2
-
3
-
 4
4 -
 5
5 -
 6
6 -
 7
7 -
 8
8 -
 9
9 -
 10
10 -
 11
11 -
 12
12 -
 13
13 -
 14
14 -
15
-
16
-
17
-
18
-
19
-
20
-
21
-
22
-
23
-
24
-
25
-
26
-
27
-
28
-
29
-
30
-
31
-
32
-
33
-
34
-
35
-
36
-
37
-
38
-
39
-
40
-
41
-
42
-
43
-
44
-
45
-
46
-
47
-
48
 |
 |