Alpine X409-WRA-JK Installation Manual EN - Page 7
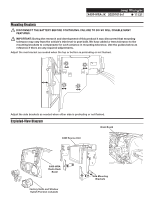
Factory Unit Disassembly Process
 |
View all Alpine X409-WRA-JK manuals
Add to My Manuals
Save this manual to your list of manuals |
Page 7 highlights
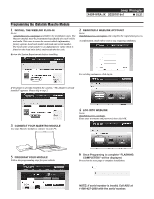
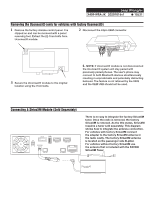
Factory Unit Disassembly Process DISCONNECT THE BATTERY BEFORE CONTINUING. FAILURE TO DO SO WILL DISABLE MANY FEATURES. 1 Remove the rubber cover from the top center storage area and extract (1) 7mm screw. Jeep Wrangler X409-WRA-JK 20201016v1 ˜ 7/21 2 Remove the knee cover panel and extract (2) 7mm screws located to the right and left sides of the steering wheel column. 3 Remove the window switch pod using a panel removing tool and extract (1) 7mm screw. Left side of steering wheel column. Right side of steering wheel column. 4 Remove the dash panel. 5 Extract (4) 7 mm screws and remove the factory radio. 6 Extract (2) 7 mm screws from the factory radio bracket and remove it. 2
-
 1
1 -
 2
2 -
 3
3 -
 4
4 -
 5
5 -
 6
6 -
 7
7 -
 8
8 -
 9
9 -
 10
10 -
 11
11 -
 12
12 -
13
-
14
-
15
-
16
-
17
-
18
-
19
-
20
-
21
 |
 |

Jeep Wrangler
X409-WRA-JK
20201016v1
±
7/21
Factory Unit Disassembly Process
DISCONNECT THE BATTERY BEFORE
CONTINUING. FAILURE TO DO SO WILL
DISABLE MANY FEATURES.
1
Remove the rubber cover from the top center
storage area and extract (1) 7mm screw.
3
Remove the window switch pod using a panel
removing tool and extract (1) 7mm screw.
5
Extract (4) 7 mm screws and remove the factory
radio.
2
Remove the knee cover panel and extract (2) 7mm
screws located to the right and left sides of the
steering wheel column.
Right side of
steering wheel
column.
Left side of
steering wheel
column.
4
Remove the dash panel.
6
Extract (2) 7 mm screws from the factory radio
bracket and remove it.
2