Archos 500982 User Manual - Page 19
Recording Audio/video, Manually
 |
UPC - 690590509825
View all Archos 500982 manuals
Add to My Manuals
Save this manual to your list of manuals |
Page 19 highlights
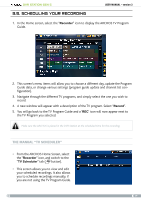
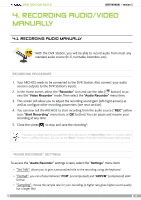
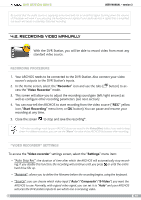
DVR Station Gen 5 User Manual - version 3 4. Recording audio/video manually 4.1. recording audio manually With the DVR Station, you will be able to record audio from most any standard audio source (hi-fi, turntable, boombox, etc). recording procedure 1. Your ARCHOS needs to be connected to the DVR Station. Also connect your audio source's outputs to the DVR Station's inputs. 2. In the Home screen, select the "Recorder" icon and use the tabs ( button) to access the "Video Recorder" mode. Then select the "Audio Recorder" menu item. 3. This screen will allow you to adjust the recording sound gain (left/right arrows) as well as configure other recording parameters (see next section). 4. You can now tell the ARCHOS to start recording from the audio source ("REC" yellow icon, "Start Recording" menu item, or OK button). You can pause and resume your recording at any time. 5. Close the screen to stop and save the recording*. * All audio recordings made by your ARCHOS device are saved in the Music/(Rec) folder. If you wish to keep them in a different location, you can use the "Move" function of the ARCHOS file browser after recording. "Audio recorder" settings To access the "Audio Recorder" settings screen, select the "Settings" menu item: - "Set Title": allows you to give a personalized title to the recording, using the keyboard. - "Format": you can choose between "PCM" (uncompressed) and "ADPCM" (compressed) WAV format. - "Sampling": choose the sample rate for your recording (a higher rate gives higher sound quality but a larger file). 19
-
 1
1 -
2
-
3
-
4
-
5
-
6
-
7
-
8
-
9
-
10
-
11
-
12
-
13
-
 14
14 -
 15
15 -
 16
16 -
 17
17 -
 18
18 -
 19
19 -
 20
20 -
 21
21 -
 22
22 -
 23
23 -
 24
24 -
25
 |
 |
