Ariens Zoom 42 Owners Manual - Page 11
ASSEMBLY, Tools Required, Unpack Unit, Connect Battery, Place Unit in Operating Position - mower review
 |
View all Ariens Zoom 42 manuals
Add to My Manuals
Save this manual to your list of manuals |
Page 11 highlights
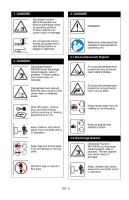
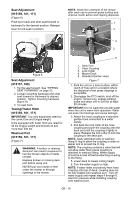
Fumes from engine exhaust can cause injury or death. DO NOT run engine in an enclosed area. Always provide good ventilation. ALWAYS maintain unit in safe operating condition. Damaged or worn out muffler can cause fire or explosion. Stop and inspect equipment if you strike an object or if there is an unusual vibration. Repair, if necessary, before restarting. Never make adjustments or repairs with the engine running. Mower blades are sharp and can cut you. Wrap the blade(s) or wear gloves, and use extra caution when servicing them. NEVER weld or straighten mower blades. Rotation of one blade may cause rotation of the other blades. Check brake operation frequently. Adjust and service as required. Keep all hardware properly tightened. Stored energy in springs can cause injury. Maintain or replace safety and instruction labels, as necessary. Never store the machine or fuel container inside a building where there is an open flame, such as a water heater. Shut off fuel (if provided) and allow engine to cool completely before storing in closed area or covering unit. Clean grass and debris from unit, especially from around muffler and engine, to help prevent fires. For extended storage, clean unit thoroughly. See storage section and Engine Manual for proper storage. Use only attachments or accessories designed for your unit. Check attachment components frequently. If worn or damaged, replace with manufacturer's recommended parts. ASSEMBLY WARNING: AVOID INJURY. Read and understand the entire Safety section before proceeding. Tools Required • Adjustable wrench • Petroleum jelly or dielectric grease. Unpack Unit Remove unit and all other components from the shipping container. Engage transmission bypass lever. See "MOVING UNIT MANUALLY" on page 20. Push unit from container onto a level surface. Disengage transmission bypass lever. Place Unit in Operating Position (Figure 3) NOTE: The seat is shipped with the seat positioned as far back as possible. 1. Push steering levers aside and tip seat up. 2. Adjust the seat as needed. See "Seat Adjustment" on page 17. 3. Remove hardware from top hole of the steering lever (Figure 3). Slide steering lever back to align slot with hole at the top of the steering pivot arm. NOTE: Do not tighten hardware before reviewing See "ADJUSTING STEERING LEVERS" on page 28. If no adjustment is desired tighten hardware. Connect Battery See "Install Factory-Installed Battery" on page 26 and perform steps 5 and 6 in the installation section. 1 3 2 1. Steering Lever 2. Steering Pivot Arm 3. Steering Lever Hardware Figure 3 GB - 11
-
 1
1 -
2
-
3
-
4
-
5
-
 6
6 -
 7
7 -
 8
8 -
 9
9 -
 10
10 -
 11
11 -
 12
12 -
 13
13 -
 14
14 -
 15
15 -
 16
16 -
17
-
18
-
19
-
20
-
21
-
22
-
23
-
24
-
25
-
26
-
27
-
28
-
29
-
30
-
31
-
32
-
33
-
34
-
35
-
36
-
37
-
38
-
39
-
40
 |
 |
