Ariens Zoom 42 Owners Manual - Page 22
Opening And Closing Hood, Mower Deck Removal And, Installation, Leveling And Adjusting - deck belt
 |
View all Ariens Zoom 42 manuals
Add to My Manuals
Save this manual to your list of manuals |
Page 22 highlights
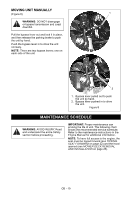
OPENING AND CLOSING HOOD (Figure 10) Open: Tip seat forward and pull up on the back of the hood until hood rests on the hood stops. Close: Push down on back of hood to close. Hood Tipped Open Figure 10 MOWER DECK REMOVAL AND INSTALLATION Remove (Figure 11) 1. Remove PTO belt from the engine drive pulley. See "REPLACING PTO BELT" on page 29. 2. Disconnect drag link from the front deck bracket. 3. Disconnect front and rear trunnions from the lift arms on both sides of the unit by removing the 3/8 nuts. Keep hardware for reinstallation. 4. Slide mower deck out from under unit. Install (Figure 11) 1. Slide mower deck under unit. 2. Connect drag link to front deck bracket. 3. Connect front and rear trunnions to the lift arms on both sides of the unit using 3/8 nuts. 4. Install PTO belt on the engine drive pulley. See "REPLACING PTO BELT" on page 29. 5. Level and adjust pitch of mower deck. See "LEVELING AND ADJUSTING PITCH OF MOWER DECK" on page 23. 7 16 1. Rear Trunnion 2. PTO Belt 3. Mower Deck 3 4. Drag Link 5. Front Trunnion 6. Lift Arms Figure 11 25 76 4 7. Nuts LEVELING AND ADJUSTING PITCH OF MOWER DECK NOTE: Adjust on a level surface, with the tires inflated to the correct air pressure. See "SPECIFICATIONS" on page 35. Three measurements are required to level and adjust the pitch of the mower deck. 1. The distance from the mower blades to the ground. 2. The forward pitch of the mower blades. 3. The pitch of the mower blades from side-to-side. The Distance From The Mower Blades To The Ground (Figure 12) • In the lowest cutting position should be 1-1/2 in. ± 1/4 in. (3.175 cm ± .635 cm). GB - 22
-
 1
1 -
2
-
3
-
4
-
5
-
6
-
7
-
8
-
9
-
10
-
11
-
12
-
13
-
14
-
15
-
16
-
 17
17 -
 18
18 -
 19
19 -
 20
20 -
 21
21 -
 22
22 -
 23
23 -
 24
24 -
 25
25 -
 26
26 -
 27
27 -
28
-
29
-
30
-
31
-
32
-
33
-
34
-
35
-
36
-
37
-
38
-
39
-
40
 |
 |
