Ariens Zoom 42 Owners Manual - Page 24
Replacing Mower Blade, Sharpening Mower Blade, Remove, Install - inch mower
 |
View all Ariens Zoom 42 manuals
Add to My Manuals
Save this manual to your list of manuals |
Page 24 highlights
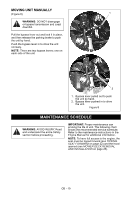
3 2 1 2 4 3 1 1. Trunnion 2. Mower Deck 3. Lock Nut 4. Hex Nut Figure 15 REPLACING MOWER BLADE Remove (Figure 16) CAUTION: Mower blades are sharp and can cut you. Wrap the blades or wear gloves, and use extra caution when servicing them. 1. Block mower blades to prevent rotation. 2. Remove mounting hardware and mower blades from spindles. Install (Figure 16) 1. Install mower blades on spindles with mounting hardware. 2. Torque 5/8-inch nut to 100 to 120 lbf-ft (136 to 163 N•m). 4 1. Spindle 2. Blade 3. Washer 4. 5/8 in. Nut Figure 16 SHARPENING MOWER BLADE CAUTION: DO NOT sharpen mower blade while on unit. An unbalanced mower blade will cause excessive vibration and eventual damage to unit. Check mower blade balance prior to reinstalling mower blades. NEVER weld or straighten mower blades. 1. Remove mower blade from unit. See "REPLACING MOWER BLADE" on page 25. Ariens recommends having mower blades sharpened by a professional. Contact your Ariens dealer. Discard mower blade if (Figure 17): • more than 1/2 in. (1.27 cm) of metal is removed. • the air lift erosion area is eroded. • the mower blade is bent or broken. Do not change angle of cutting edge or round the corner at the end of mower blade. 2. Sharpen mower blade by removing an equal amount of material from each end of mower blade. 3. Check mower blade balance by sliding mower blade on an unthreaded bolt. If blade is balanced, it should remain in a horizontal position. If either end of mower blade moves downward, sharpen the heavy end until mower blade is balanced. GB - 24
-
 1
1 -
2
-
3
-
4
-
5
-
6
-
7
-
8
-
9
-
10
-
11
-
12
-
13
-
14
-
15
-
16
-
17
-
18
-
 19
19 -
 20
20 -
 21
21 -
 22
22 -
 23
23 -
 24
24 -
 25
25 -
 26
26 -
 27
27 -
 28
28 -
 29
29 -
30
-
31
-
32
-
33
-
34
-
35
-
36
-
37
-
38
-
39
-
40
 |
 |
