Ariens Zoom 42 Owners Manual - Page 16
Seat Adjustment - mulching blades
 |
View all Ariens Zoom 42 manuals
Add to My Manuals
Save this manual to your list of manuals |
Page 16 highlights
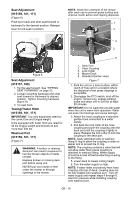
Seat Adjustment (915159, 161, 171) (Figure 6) Push lever back and slide seat forward or backward to the desired position. Release lever to lock seat in position. NOTE: Wash the underside of the mower after each use to prevent grass buildup and improve mulch action and clipping dispersal. 1 3 4 2 5 Figure 6 Seat Adjustment (915157, 169) 1. Tip the seat forward. See "TIPPING SEAT FORWARD" on page 22. 2. Loosen mounting hardware and slide seat forward or backward to desired position. Tighten mounting hardware (figure 9). 3. Tip seat back. Towing/Trailer Hitch (915159, 161, 171) IMPORTANT: Tow only equipment rated for the correct tow and tongue weight. Units equipped with trailer hitch are rated for 30 lbs tongue weight and should not pull more than 300 lbs. Washout Port (915159, 161, 171) (Figure 7) WARNING: A broken or missing deck port can result in exposure to harmful thrown objects or blade contact. Replace broken or missing deck port before using unit. NEVER put your hands or feet under the mower or through openings in the mower. 1. Deck Port 2. Hose Coupling 3. Lock Collar 4. Mower Deck 5. Standard Garden Hose Figure 7 1. Park the unit on a level surface, within reach of hose and in a location where the dispersal of wet grass clippings is acceptable. 2. Disengage the PTO switch, shut off the engine, remove key, engage parking brake and allow unit to cool for at least 30 minutes. IMPORTANT: Do not wash the unit with water when the unit is warm from operation. Water can seep into bearings and cause damage. 3. Attach the hose coupling to a standard garden hose connected to a water supply. 4. Pull back the lock collar of the hose coupling and push the coupling onto the deck port until the coupling it tightly in place. Release the lock collar to lock the coupling to the deck port. NOTE: Apply petroleum jelly to washout fitting O-ring to allow the coupling to slide on easier and to protect the O-ring. NOTE: The coupling contains a valve that will not allow water flow unless coupling is attached to washout fitting. Water supply should be turned off before attaching coupling to the fitting. 5. Lower deck to lowest cutting height. 6. Turn the water supply on high. NOTE: If water leaks excessively from hose coupling onto top of deck, coupling may not be fully seated onto washout port. Turn off water supply and repeat steps 4 through 6. Use firm pressure while installing coupling onto washout port. GB - 16
-
 1
1 -
2
-
3
-
4
-
5
-
6
-
7
-
8
-
9
-
10
-
 11
11 -
 12
12 -
 13
13 -
 14
14 -
 15
15 -
 16
16 -
 17
17 -
 18
18 -
 19
19 -
 20
20 -
 21
21 -
22
-
23
-
24
-
25
-
26
-
27
-
28
-
29
-
30
-
31
-
32
-
33
-
34
-
35
-
36
-
37
-
38
-
39
-
40
 |
 |
