Asus AW1500-S5 AW1500-I5 English Manual - Page 35
near the locked icon.
 |
View all Asus AW1500-S5 manuals
Add to My Manuals
Save this manual to your list of manuals |
Page 35 highlights
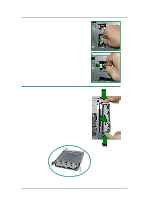
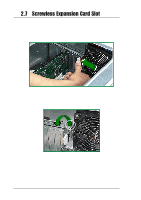
5. Carefully insert device (such as CD/DVD-ROM drive) into the selected bay. 6. Secure the drive to the bay using the screwless drive bay lock that you removed earlier. 6.a Match the two pegs on the lock to the holes on the drive bay. 6.b Turn the knob 45º clockwise until it clicks on the reference point near the "locked icon". 7. Remove the appropriate plastic bay cover on the front panel. Front Panel door hinges Front Panel plastic bay cover 8. Fasten the four (4) front panel hinges to the slotted chassis holes then close the front panel cover. User's Manual 2-15
-
 1
1 -
2
-
3
-
4
-
5
-
6
-
7
-
8
-
9
-
10
-
11
-
12
-
13
-
14
-
15
-
16
-
17
-
18
-
19
-
20
-
21
-
22
-
23
-
24
-
25
-
26
-
27
-
28
-
29
-
 30
30 -
 31
31 -
 32
32 -
 33
33 -
 34
34 -
 35
35 -
 36
36 -
 37
37 -
 38
38 -
 39
39 -
 40
40 -
41
-
42
-
43
-
44
-
45
-
46
-
47
-
48
-
49
-
50
-
51
-
52
-
53
-
54
-
55
-
56
 |
 |

User’s Manual
2-15
5.
Carefully insert device
(such as CD/DVD-ROM
drive) into the selected bay.
6.
Secure the drive to the bay using the screwless drive bay lock that you
removed earlier.
6.a
Match the two pegs
on the lock to the
holes on the drive bay.
6.b
Turn the knob 45º
clockwise until it clicks
on the reference point
near the “locked icon”.
Front Panel plastic bay cover
Front Panel door hinges
7.
Remove the appropriate
plastic bay cover on the
front panel.
8.
Fasten the four (4) front
panel hinges to the slotted
chassis holes then close
the front panel cover.