Asus E500 G5 SFF User Manual - Page 29
Replacing the assembly module and front cover
 |
View all Asus E500 G5 SFF manuals
Add to My Manuals
Save this manual to your list of manuals |
Page 29 highlights
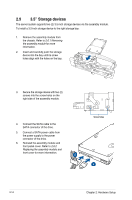
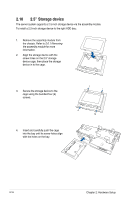
2.6.2 Replacing the assembly module and front cover To replace the assembly module and front panel cover: 1. Align the assembly module with the chassis and insert it into the chassis. 2. Push the assembly module lock towards the rear ton secure the assembly module. 3. Align the front panel cover to the chassis and replace the front panel cover. Ensure the front panel cover latches are secure. ASUS E500 G5 SFF 2-11
-
 1
1 -
2
-
3
-
4
-
5
-
6
-
7
-
8
-
9
-
10
-
11
-
12
-
13
-
14
-
15
-
16
-
17
-
18
-
19
-
20
-
21
-
22
-
23
-
 24
24 -
 25
25 -
 26
26 -
 27
27 -
 28
28 -
 29
29 -
 30
30 -
 31
31 -
 32
32 -
 33
33 -
 34
34 -
35
-
36
-
37
-
38
-
39
-
40
-
41
-
42
-
43
-
44
-
45
-
46
-
47
-
48
-
49
-
50
-
51
-
52
-
53
-
54
-
55
-
56
-
57
-
58
-
59
-
60
-
61
-
62
-
63
-
64
-
65
-
66
-
67
-
68
-
69
-
70
-
71
-
72
-
73
-
74
-
75
-
76
-
77
-
78
-
79
-
80
-
81
-
82
-
83
-
84
-
85
-
86
-
87
-
88
-
89
-
90
-
91
-
92
-
93
-
94
-
95
-
96
-
97
-
98
-
99
-
100
-
101
-
102
-
103
-
104
-
105
-
106
-
107
-
108
-
109
-
110
-
111
-
112
-
113
-
114
-
115
-
116
-
117
-
118
-
119
-
120
-
121
-
122
-
123
-
124
-
125
-
126
-
127
-
128
-
129
-
130
-
131
-
132
-
133
-
134
-
135
-
136
-
137
-
138
-
139
-
140
-
141
-
142
 |
 |

2-11
ASUS E500 G5 SFF
1.
Align the assembly module with the chassis and insert it into the chassis.
2.
Push the assembly module lock towards the rear ton secure the assembly module.
3.
Align the front panel cover to the chassis and replace the front panel cover. Ensure the
front panel cover latches are secure.
2.6.2
Replacing the assembly module and front cover
To replace the assembly module and front panel cover: