Asus ESC1000 User Guide - Page 37
Carefully insert the drive tray and push
 |
View all Asus ESC1000 manuals
Add to My Manuals
Save this manual to your list of manuals |
Page 37 highlights
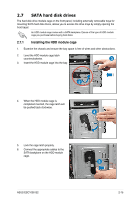
2. Firmly hold the tray lever and pull the drive tray out of the bay. 3. Take note of the drive tray holes. Each side has three holes to fit different types of hard disk drives. Use two screws on each side to secure the hard disk drive. 4. Place a SATA hard disk drive on the tray, and then secure it with four screws. 5. Carefully insert the drive tray and push it all the way to the depth of the bay until just a small fraction of the tray edge protrudes. When installed, the SATA connector on the drive connects to the SATA interface on the backplane. ASUS ESC1000 G2 2-17
-
 1
1 -
2
-
3
-
4
-
5
-
6
-
7
-
8
-
9
-
10
-
11
-
12
-
13
-
14
-
15
-
16
-
17
-
18
-
19
-
20
-
21
-
22
-
23
-
24
-
25
-
26
-
27
-
28
-
29
-
30
-
31
-
 32
32 -
 33
33 -
 34
34 -
 35
35 -
 36
36 -
 37
37 -
 38
38 -
 39
39 -
 40
40 -
 41
41 -
 42
42 -
43
-
44
-
45
-
46
-
47
-
48
-
49
-
50
-
51
-
52
-
53
-
54
-
55
-
56
-
57
-
58
-
59
-
60
-
61
-
62
-
63
-
64
-
65
-
66
-
67
-
68
-
69
-
70
-
71
-
72
-
73
-
74
-
75
-
76
-
77
-
78
-
79
-
80
-
81
-
82
-
83
-
84
-
85
-
86
-
87
-
88
-
89
-
90
-
91
-
92
-
93
-
94
-
95
-
96
-
97
-
98
-
99
-
100
-
101
-
102
-
103
-
104
-
105
-
106
-
107
-
108
-
109
-
110
-
111
-
112
-
113
-
114
-
115
-
116
-
117
-
118
-
119
-
120
-
121
-
122
-
123
-
124
-
125
-
126
-
127
-
128
-
129
-
130
-
131
-
132
-
133
-
134
-
135
-
136
-
137
-
138
-
139
-
140
-
141
-
142
-
143
-
144
-
145
-
146
-
147
-
148
-
149
-
150
-
151
-
152
-
153
-
154
-
155
-
156
-
157
-
158
-
159
-
160
-
161
-
162
-
163
-
164
-
165
-
166
-
167
-
168
-
169
-
170
-
171
-
172
-
173
-
174
-
175
-
176
-
177
-
178
-
179
-
180
-
181
-
182
-
183
-
184
-
185
-
186
-
187
-
188
-
189
-
190
-
191
-
192
-
193
-
194
 |
 |

2-17
ASUS ESC1000 G2
2.
Firmly hold the tray lever and pull the
drive tray out of the bay.
3.
Take note of the drive tray holes. Each
side has three holes to fit different types
of hard disk drives. Use two screws on
each side to secure the hard disk drive.
4.
Place a SATA hard disk drive on the tray,
and then secure it with four screws.
5.
Carefully insert the drive tray and push
it all the way to the depth of the bay until
just a small fraction of the tray edge
protrudes.
When installed, the SATA connector on the drive connects to the SATA interface on the
backplane.