Asus P4C800 Deluxe P4C800 Deluxe user manual English version E1224 - Page 117
reboot your computer.
 |
View all Asus P4C800 Deluxe manuals
Add to My Manuals
Save this manual to your list of manuals |
Page 117 highlights
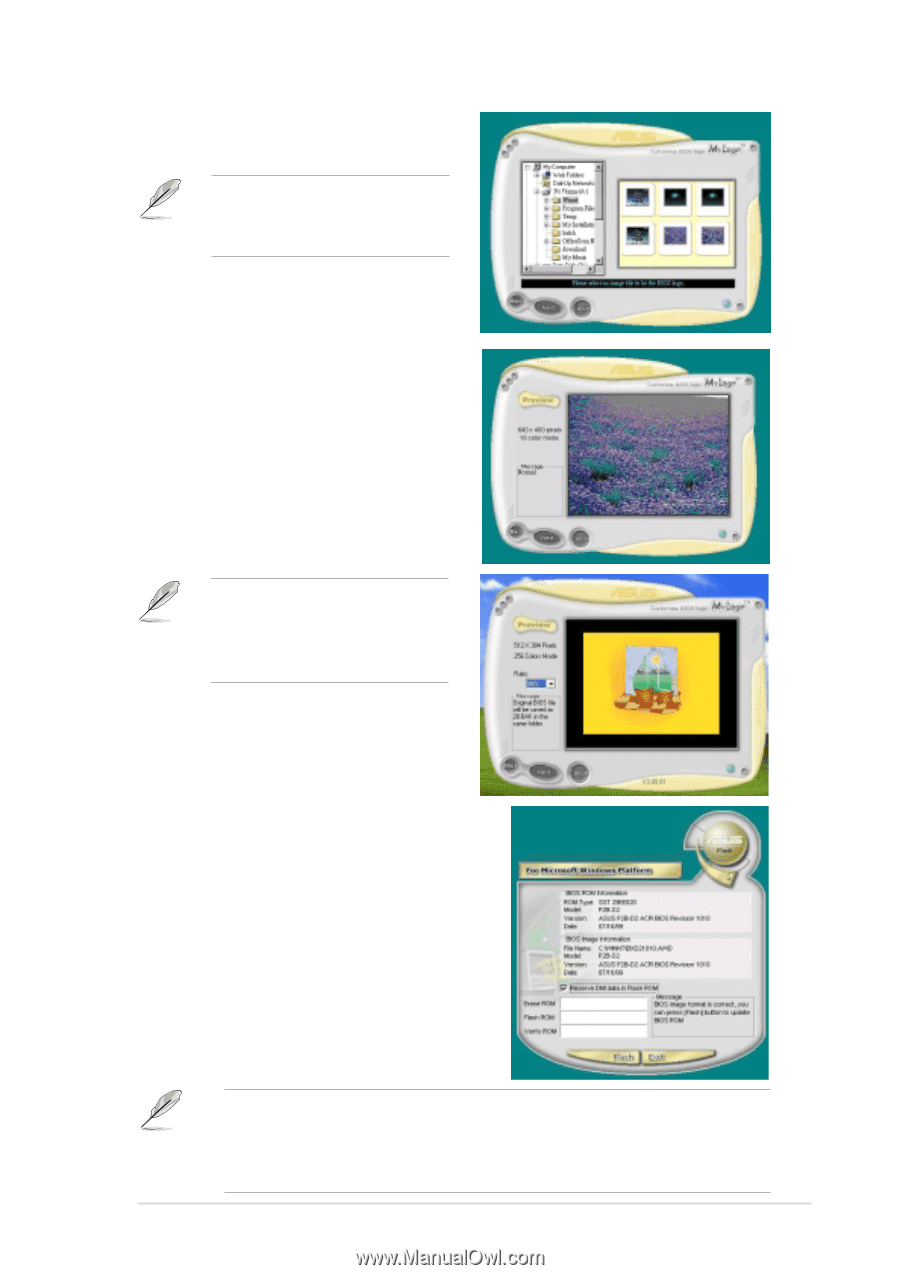
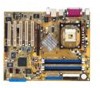
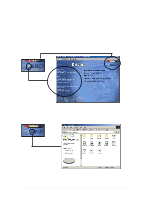
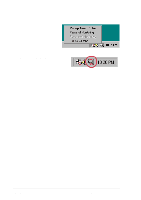
4. From the selection that appears, choose a logo image. Click Next. If you wish, you may create your own boot logo image in GIF, JPG, or BMP file formats. 5. When you click on an image, it displays larger on the MyLogo2 screen. If you wish to make the logo image smaller, click on the arrow on the Ratio item and select your desired scale. 6. The next screen prompts you to flash the original BIOS to update it with the new boot logo. Click Flash to update the BIOS. 7. When finished, click Exit, then reboot your computer. Your system boots with the new boot logo. Instead of starting from ASUS Update, you may also launch ASUS MyLogo2 directly from the Windows Start menu to change your BIOS boot logo. After you have modified the BIOS file with the new logo, use the ASUS Update utility to upload the new BIOS. ASUS P4C800 Deluxe motherboard user guide 5-9
-
 1
1 -
2
-
3
-
4
-
5
-
6
-
7
-
8
-
9
-
10
-
11
-
12
-
13
-
14
-
15
-
16
-
17
-
18
-
19
-
20
-
21
-
22
-
23
-
24
-
25
-
26
-
27
-
28
-
29
-
30
-
31
-
32
-
33
-
34
-
35
-
36
-
37
-
38
-
39
-
40
-
41
-
42
-
43
-
44
-
45
-
46
-
47
-
48
-
49
-
50
-
51
-
52
-
53
-
54
-
55
-
56
-
57
-
58
-
59
-
60
-
61
-
62
-
63
-
64
-
65
-
66
-
67
-
68
-
69
-
70
-
71
-
72
-
73
-
74
-
75
-
76
-
77
-
78
-
79
-
80
-
81
-
82
-
83
-
84
-
85
-
86
-
87
-
88
-
89
-
90
-
91
-
92
-
93
-
94
-
95
-
96
-
97
-
98
-
99
-
100
-
101
-
102
-
103
-
104
-
105
-
106
-
107
-
108
-
109
-
110
-
111
-
 112
112 -
 113
113 -
 114
114 -
 115
115 -
 116
116 -
 117
117 -
 118
118 -
 119
119 -
 120
120 -
 121
121 -
 122
122 -
123
-
124
-
125
-
126
-
127
-
128
-
129
-
130
-
131
-
132
-
133
-
134
-
135
-
136
-
137
-
138
 |
 |