Asus P5N-D User Manual - Page 143
Entering the NVIDIA, RAID utility
 |
UPC - 610839159123
View all Asus P5N-D manuals
Add to My Manuals
Save this manual to your list of manuals |
Page 143 highlights
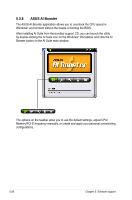
Make sure to re-enter your NVRAID settings after the CMOS is cleared; otherwise, the system will not recognize your RAID setup. • For detailed descriptions on the NVIDIA® RAID configuration, refer to the "NVIDIA® RAID User Guide" found in your motherboard Support CD. • When using Windows® XP operating system, make sure to install the Windows® XP Service Pack 2 or later versions�. Entering the NVIDIA® RAID utility To enter the NVIDIA® RAID utility: 1. Boot up your computer. 2. During POST, press to display the main menu of the utility. The RAID BIOS setup screens shown in this section are for reference only, and may not exactly match the items on your screen. NVIDIA RAID Utility Oct 5 2004 - Define a New Array - RAID Mode: Striping Striping Block: Optimal Free Disks Loc Disk Model Name 1.0.M XXXXXXXXXXXXXXXXXX 1.1.M XXXXXXXXXXXXXXXXXX 2.0.M XXXXXXXXXXXXXXXXXX 2.1.M XXXXXXXXXXXXXXXXXX Array Disks Loc Disk Model Name [→] Add [←] Del [F6] Back [F7] Finish [TAB] Navigate [↑↓] Select [ENTER] Popup At the bottom of the screen are the navigation keys. These keys allow you to move through and select menu options. ASUS P5N-D 5-31
-
 1
1 -
2
-
3
-
4
-
5
-
6
-
7
-
8
-
9
-
10
-
11
-
12
-
13
-
14
-
15
-
16
-
17
-
18
-
19
-
20
-
21
-
22
-
23
-
24
-
25
-
26
-
27
-
28
-
29
-
30
-
31
-
32
-
33
-
34
-
35
-
36
-
37
-
38
-
39
-
40
-
41
-
42
-
43
-
44
-
45
-
46
-
47
-
48
-
49
-
50
-
51
-
52
-
53
-
54
-
55
-
56
-
57
-
58
-
59
-
60
-
61
-
62
-
63
-
64
-
65
-
66
-
67
-
68
-
69
-
70
-
71
-
72
-
73
-
74
-
75
-
76
-
77
-
78
-
79
-
80
-
81
-
82
-
83
-
84
-
85
-
86
-
87
-
88
-
89
-
90
-
91
-
92
-
93
-
94
-
95
-
96
-
97
-
98
-
99
-
100
-
101
-
102
-
103
-
104
-
105
-
106
-
107
-
108
-
109
-
110
-
111
-
112
-
113
-
114
-
115
-
116
-
117
-
118
-
119
-
120
-
121
-
122
-
123
-
124
-
125
-
126
-
127
-
128
-
129
-
130
-
131
-
132
-
133
-
134
-
135
-
136
-
137
-
 138
138 -
 139
139 -
 140
140 -
 141
141 -
 142
142 -
 143
143 -
 144
144 -
 145
145 -
 146
146 -
 147
147 -
 148
148 -
149
-
150
-
151
-
152
-
153
-
154
-
155
-
156
-
157
-
158
-
159
-
160
-
161
-
162
-
163
-
164
 |
 |
