Asus P6TD DELUXE User Manual - Page 154
Configuring Express Gate SSD in BIOS Setup
 |
View all Asus P6TD DELUXE manuals
Add to My Manuals
Save this manual to your list of manuals |
Page 154 highlights
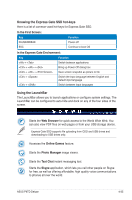
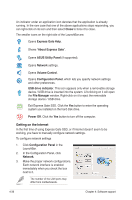
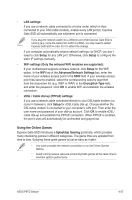
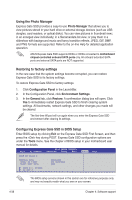
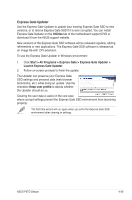
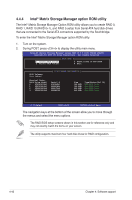
Using the Photo Manager Express Gate SSD provides a easy-to-use Photo Manager that allows you to view pictures stored in your hard drive or external storage devices (such as USB dongles, card readers, or optical disks). You can view pictures in thumbnail view; in an enlarged view individually; in a filename/data list view; or play them in a slideshow with background music and fancy transition effects. JPEG, GIF, BMP, and PNG formats are supported. Refer to the on-line Help for detailed application operation. ASUS Express Gate SSD supports HDDs or ODDs connected to motherboard chipset-controlled onboard SATA ports only. All onboard extended SATA ports and external SATA ports are NOT supported. Restoring to factory settings In the rare case that the system settings become corrupted, you can restore Express Gate SSD to its factory settings. To restore Express Gate SSD to factory settings 1. Click Configuration Panel in the LaunchBar. 2. In the Configuration Panel, click Environment Settings. 3. In the General tab, click Restore. A confirmation dialog box will open. Click Yes to immediately restart Express Gate SSD to finish clearing system settings. All bookmarks, network settings, and other changes you made will be cleared. The first-time Wizard will run again when you enter the Express Gate SSD environment after clearing its settings. Configuring Express Gate SSD in BIOS Setup Enter BIOS setup by clicking Exit on the Express Gate SSD First Screen, and then press the key during POST. Express Gate SSD configuration options are under the Tools menu. See the chapter of BIOS setup in your motherboard user manual for details. Main Ai Tweaker BIOS SETUP UTILITY Advanced Power Boot Tools Exit ASUS EZ Flash 2 Express Gate Enter OS Timer Reset User Data [Enabled] [10 Seconds] [No] ASUS O.C. Profile AI NET 2 The BIOS setup screens shown in this section are for reference purposes only, and may not exactly match what you see on your screen. 4-38 Chapter 4: Software support
-
 1
1 -
2
-
3
-
4
-
5
-
6
-
7
-
8
-
9
-
10
-
11
-
12
-
13
-
14
-
15
-
16
-
17
-
18
-
19
-
20
-
21
-
22
-
23
-
24
-
25
-
26
-
27
-
28
-
29
-
30
-
31
-
32
-
33
-
34
-
35
-
36
-
37
-
38
-
39
-
40
-
41
-
42
-
43
-
44
-
45
-
46
-
47
-
48
-
49
-
50
-
51
-
52
-
53
-
54
-
55
-
56
-
57
-
58
-
59
-
60
-
61
-
62
-
63
-
64
-
65
-
66
-
67
-
68
-
69
-
70
-
71
-
72
-
73
-
74
-
75
-
76
-
77
-
78
-
79
-
80
-
81
-
82
-
83
-
84
-
85
-
86
-
87
-
88
-
89
-
90
-
91
-
92
-
93
-
94
-
95
-
96
-
97
-
98
-
99
-
100
-
101
-
102
-
103
-
104
-
105
-
106
-
107
-
108
-
109
-
110
-
111
-
112
-
113
-
114
-
115
-
116
-
117
-
118
-
119
-
120
-
121
-
122
-
123
-
124
-
125
-
126
-
127
-
128
-
129
-
130
-
131
-
132
-
133
-
134
-
135
-
136
-
137
-
138
-
139
-
140
-
141
-
142
-
143
-
144
-
145
-
146
-
147
-
148
-
 149
149 -
 150
150 -
 151
151 -
 152
152 -
 153
153 -
 154
154 -
 155
155 -
 156
156 -
 157
157 -
 158
158 -
 159
159 -
160
-
161
-
162
-
163
-
164
-
165
-
166
-
167
-
168
-
169
-
170
-
171
-
172
-
173
-
174
-
175
-
176
-
177
-
178
 |
 |