Asus P6TD DELUXE User Manual - Page 67
Installing the additional heatsink fan
 |
View all Asus P6TD DELUXE manuals
Add to My Manuals
Save this manual to your list of manuals |
Page 67 highlights
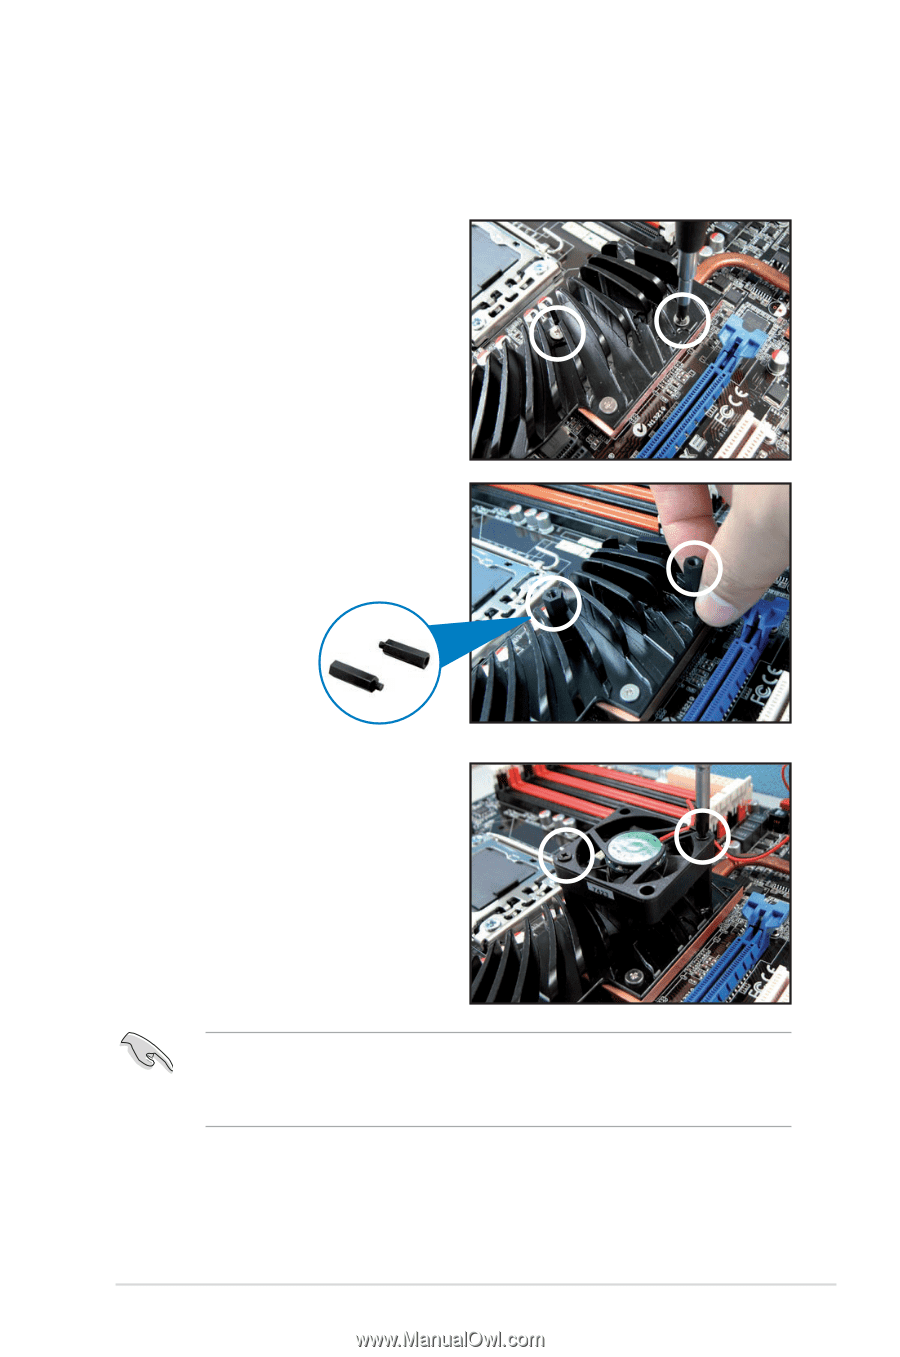
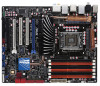
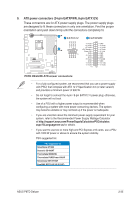
2.9 Installing the additional heatsink fan You can install an additional 40 mm x 40 mm system fan (purchased separately) on the Northbridge heatsink for better cooling performance. Follow the instructions below to install the system fan. 1. Locate the two screws on the Northbridge heatsink, as shown in the right figure, and then remove the two screws from the heatsink. 2. Take out the two bundled screw pillars from the package, and then secure the pillars to the Northbridge heatsink, as shown in the right figure. Screw pillars 3. Secure the fan to the screw pillar with two (2) standard M3 screws (purchased separately). • Plug the fan cable to the CHA_FAN3 connector on the motherboard. • Ensure the fan is installed correctly to prevent damage to the fan and motherboard components. ASUS P6TD Deluxe 2-39
-
 1
1 -
2
-
3
-
4
-
5
-
6
-
7
-
8
-
9
-
10
-
11
-
12
-
13
-
14
-
15
-
16
-
17
-
18
-
19
-
20
-
21
-
22
-
23
-
24
-
25
-
26
-
27
-
28
-
29
-
30
-
31
-
32
-
33
-
34
-
35
-
36
-
37
-
38
-
39
-
40
-
41
-
42
-
43
-
44
-
45
-
46
-
47
-
48
-
49
-
50
-
51
-
52
-
53
-
54
-
55
-
56
-
57
-
58
-
59
-
60
-
61
-
 62
62 -
 63
63 -
 64
64 -
 65
65 -
 66
66 -
 67
67 -
 68
68 -
 69
69 -
 70
70 -
 71
71 -
 72
72 -
73
-
74
-
75
-
76
-
77
-
78
-
79
-
80
-
81
-
82
-
83
-
84
-
85
-
86
-
87
-
88
-
89
-
90
-
91
-
92
-
93
-
94
-
95
-
96
-
97
-
98
-
99
-
100
-
101
-
102
-
103
-
104
-
105
-
106
-
107
-
108
-
109
-
110
-
111
-
112
-
113
-
114
-
115
-
116
-
117
-
118
-
119
-
120
-
121
-
122
-
123
-
124
-
125
-
126
-
127
-
128
-
129
-
130
-
131
-
132
-
133
-
134
-
135
-
136
-
137
-
138
-
139
-
140
-
141
-
142
-
143
-
144
-
145
-
146
-
147
-
148
-
149
-
150
-
151
-
152
-
153
-
154
-
155
-
156
-
157
-
158
-
159
-
160
-
161
-
162
-
163
-
164
-
165
-
166
-
167
-
168
-
169
-
170
-
171
-
172
-
173
-
174
-
175
-
176
-
177
-
178
 |
 |