Asus P8B-X User Guide - Page 107
Make disk
 |
View all Asus P8B-X manuals
Add to My Manuals
Save this manual to your list of manuals |
Page 107 highlights
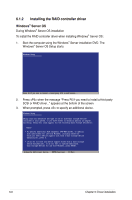
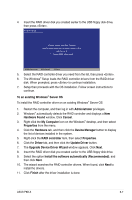
To create a RAID driver disk in Windows® environment 1. Start Windows®. 2. Place the motherboard support DVD into the optical drive. If Autorun is NOT enabled in your computer, browse the contents of the support DVD to locate the file ASSETUP.EXE from the BIN folder. Double-click the ASSETUP.EXE to run the support DVD. 3. Go to the Make disk menu, and then select the type of RAID driver disk you want to create. 4. Insert a floppy disk into the USB floppy disk drive. 5. Follow succeeding screen instructions to complete the process. Write-protect the floppy disk to avoid computer virus infection. ASUS P8B-X 6-5
-
 1
1 -
2
-
3
-
4
-
5
-
6
-
7
-
8
-
9
-
10
-
11
-
12
-
13
-
14
-
15
-
16
-
17
-
18
-
19
-
20
-
21
-
22
-
23
-
24
-
25
-
26
-
27
-
28
-
29
-
30
-
31
-
32
-
33
-
34
-
35
-
36
-
37
-
38
-
39
-
40
-
41
-
42
-
43
-
44
-
45
-
46
-
47
-
48
-
49
-
50
-
51
-
52
-
53
-
54
-
55
-
56
-
57
-
58
-
59
-
60
-
61
-
62
-
63
-
64
-
65
-
66
-
67
-
68
-
69
-
70
-
71
-
72
-
73
-
74
-
75
-
76
-
77
-
78
-
79
-
80
-
81
-
82
-
83
-
84
-
85
-
86
-
87
-
88
-
89
-
90
-
91
-
92
-
93
-
94
-
95
-
96
-
97
-
98
-
99
-
100
-
101
-
 102
102 -
 103
103 -
 104
104 -
 105
105 -
 106
106 -
 107
107 -
 108
108 -
 109
109 -
 110
110 -
 111
111 -
 112
112 -
113
-
114
-
115
-
116
-
117
-
118
-
119
-
120
-
121
-
122
-
123
-
124
-
125
-
126
-
127
-
128
 |
 |

ASUS P8B-X
6-5
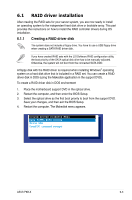
To create a RAID driver disk in Windows
®
environment
1.
Start Windows
®
.
2.
Place the motherboard support DVD into the optical drive.
If Autorun is NOT enabled in your computer, browse the contents of the support
DVD to locate the file A
SSETUP.EXE
from the
BIN
folder. Double-click the
ASSETUP.EXE
to run the support DVD.
3.
Go to the
Make disk
menu, and then select the type of RAID driver disk you
want to create.
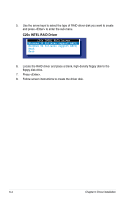
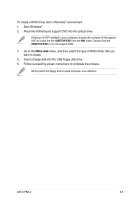
4.
Insert a floppy disk into the USB floppy disk drive.
5.
Follow succeeding screen instructions to complete the process.
Write-protect the floppy disk to avoid computer virus infection.