Asus ROG GR8 ROG GR8 User Guide English - Page 32
Upgrading memory modules
 |
View all Asus ROG GR8 manuals
Add to My Manuals
Save this manual to your list of manuals |
Page 32 highlights
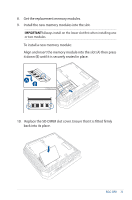
Upgrading memory modules Your ROG GR8 comes with two SO-DIMM memory slots that allow you to install up to two 8 GB DDR3L 204-pin SO-DIMMs for a maximum of 16 GB memory. IMPORTANT! You can only install DDR3L (1.35V Low Voltage) 204-pin SO-DIMM to the ROG GR8's DIMM slots. NOTE: Refer to http://www.asus.com for the list of compatible DIMMs. To install or upgrade the memory modules: 1. Turn off your ROG GR8. 2. Disconnect all cables and peripherals. 3. Place the ROG GR8 on its side on a stable and flat surface. 4. Move down the latch at the rear panel to unlock the side cover. NOTE: Before you remove the side cover, ensure that the UNLOCK label on the latch is visible. 32 ROG GR8
-
 1
1 -
2
-
3
-
4
-
5
-
6
-
7
-
8
-
9
-
10
-
11
-
12
-
13
-
14
-
15
-
16
-
17
-
18
-
19
-
20
-
21
-
22
-
23
-
24
-
25
-
26
-
 27
27 -
 28
28 -
 29
29 -
 30
30 -
 31
31 -
 32
32 -
 33
33 -
 34
34 -
 35
35 -
 36
36 -
 37
37 -
38
-
39
-
40
-
41
-
42
-
43
-
44
-
45
-
46
-
47
-
48
-
49
-
50
-
51
-
52
-
53
-
54
 |
 |
32
ROG GR8
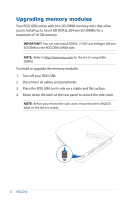
Upgrading memory modules
Your ROG GR8 comes with two SO-DIMM memory slots that allow
you to install up to two 8 GB DDR3L 204-pin SO-DIMMs for a
maximum of 16 GB memory.
IMPORTANT!
You can only install DDR3L (1.35V Low Voltage) 204-pin
SO-DIMM to the ROG GR8’s DIMM slots.
NOTE:
Refer to http://www.asus.com for the list of compatible
DIMMs.
To install or upgrade the memory modules:
1.
Turn off your ROG GR8.
2.
Disconnect all cables and peripherals.
3.
Place the ROG GR8 on its side on a stable and flat surface.
4.
Move down the latch at the rear panel to unlock the side cover.
NOTE:
Before you remove the side cover, ensure that the UNLOCK
label on the latch is visible.