Asus RS920A-E6 RS8 User Guide - Page 27
CPU Installation Sequence
 |
View all Asus RS920A-E6 RS8 manuals
Add to My Manuals
Save this manual to your list of manuals |
Page 27 highlights
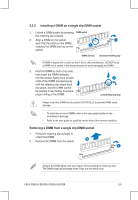
7. Close the load plate (F), then push the load lever (G) until it snaps into F the retention tab. G CPU Installation Sequence: CPU1 Configuration CPU1 Socket CPU2 Socket One Processor V Dual Processors V V Quad Processors V V CPU3 Socket CPU3 Socket V V Apply some Thermal Interface Material to the exposed area of the CPU that the heatsink will be in contact with, ensuring that it is spread in an even thin layer. Some heatsinks come with pre-applied Thermal Interface Material. If so, skip this step. ASUS RS920A-E6/RS8; RS924A-E6/RS8 2-5
-
 1
1 -
2
-
3
-
4
-
5
-
6
-
7
-
8
-
9
-
10
-
11
-
12
-
13
-
14
-
15
-
16
-
17
-
18
-
19
-
20
-
21
-
 22
22 -
 23
23 -
 24
24 -
 25
25 -
 26
26 -
 27
27 -
 28
28 -
 29
29 -
 30
30 -
 31
31 -
 32
32 -
33
-
34
-
35
-
36
-
37
-
38
-
39
-
40
-
41
-
42
-
43
-
44
-
45
-
46
-
47
-
48
-
49
-
50
-
51
-
52
-
53
-
54
-
55
-
56
-
57
-
58
-
59
-
60
-
61
-
62
-
63
-
64
-
65
-
66
-
67
-
68
-
69
-
70
-
71
-
72
-
73
-
74
-
75
-
76
-
77
-
78
-
79
-
80
-
81
-
82
-
83
-
84
-
85
-
86
-
87
-
88
-
89
-
90
-
91
-
92
-
93
-
94
-
95
-
96
-
97
-
98
-
99
-
100
-
101
-
102
-
103
-
104
-
105
-
106
-
107
-
108
-
109
-
110
-
111
-
112
-
113
-
114
-
115
-
116
-
117
-
118
-
119
-
120
-
121
-
122
-
123
-
124
-
125
-
126
-
127
-
128
-
129
-
130
-
131
-
132
-
133
-
134
-
135
-
136
-
137
-
138
-
139
-
140
-
141
-
142
-
143
-
144
-
145
-
146
-
147
-
148
-
149
-
150
-
151
-
152
-
153
-
154
-
155
-
156
-
157
-
158
-
159
-
160
-
161
-
162
 |
 |

2-5
ASUS RS920A-E6/RS8; RS924A-E6/RS8
Apply some Thermal Interface Material to the exposed area of the
CPU that the heatsink will be in contact with, ensuring that it is spread
in an even thin layer. Some heatsinks come with pre-applied Thermal
Interface Material. If so, skip this step.
7.
Close the load plate (F), then push
the load lever (G) until it snaps into
the retention tab.
F
G
CPU1 Configuration
CPU1 Socket
CPU2 Socket
CPU3 Socket
CPU3 Socket
One Processor
V
Dual Processors
V
V
Quad Processors
V
V
V
V
CPU Installation Sequence: