Asus S5Ne S5 Hardware User''s Manual English Edition (E1966) - Page 45
Using the Slim Optical Disk Drive's Emergency Manual Eject, Ejecting a Disc from the External Slim
 |
View all Asus S5Ne manuals
Add to My Manuals
Save this manual to your list of manuals |
Page 45 highlights
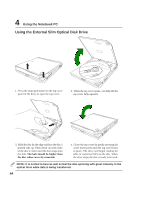
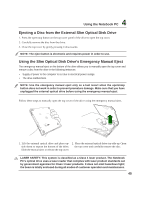
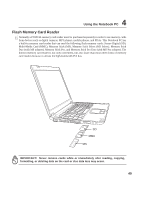
4 Using the Notebook PC Ejecting a Disc from the External Slim Optical Disk Drive 1. Press the open/stop button on the top cover panel of the drive to open the top cover. 2. Carefully remove the disc from the drive. 3. Close the top cover by gently pressing it downwards. NOTE: The eject button is electronic and requires power in order to use. Using the Slim Optical Disk Drive's Emergency Manual Eject The emergency manual eject on the bottom of the drive allows you to manually open the top cover and remove a disc from the drive in the following instances: • Supply of power to the computer is cut due to electrical power outage • The drive malfunctions NOTE: Use the emergency manual eject only as a last resort when the open/stop button does not work in order to prevent premature damage. Make sure that you have unplugged the external optical drive before using the emergency manual eject. Follow these steps to manually open the top cover of the drive using the emergency manual eject. 1. Lift the external optical drive and place up- 2. Place the external optical drive top-side up. Open side down to expose the bottom of the drive. the top cover and carefully remove the disc. Slide the manual eject to release the top cover. LASER SAFETY: This system is classified as a Class 1 laser product. The Notebook PC's optical drive uses a laser reader that complies with laser product standards set by government agencies for Class 1 laser products. It does not emit hazardous light; the beam is totally enclosed during all modes of customer operation and maintenance. 45
-
 1
1 -
2
-
3
-
4
-
5
-
6
-
7
-
8
-
9
-
10
-
11
-
12
-
13
-
14
-
15
-
16
-
17
-
18
-
19
-
20
-
21
-
22
-
23
-
24
-
25
-
26
-
27
-
28
-
29
-
30
-
31
-
32
-
33
-
34
-
35
-
36
-
37
-
38
-
39
-
 40
40 -
 41
41 -
 42
42 -
 43
43 -
 44
44 -
 45
45 -
 46
46 -
 47
47 -
 48
48 -
 49
49 -
 50
50 -
51
-
52
-
53
-
54
-
55
-
56
-
57
-
58
-
59
-
60
-
61
-
62
-
63
-
64
-
65
-
66
-
67
-
68
-
69
-
70
-
71
-
72
-
73
-
74
-
75
-
76
-
77
-
78
-
79
-
80
-
81
-
82
-
83
-
84
 |
 |
