Asus SBW-06D2X-U SBC-06D2XU & SBW-06D2XU QIG Quick Installation Guide - Page 13
Connect the optical drive to your computer
 |
View all Asus SBW-06D2X-U manuals
Add to My Manuals
Save this manual to your list of manuals |
Page 13 highlights
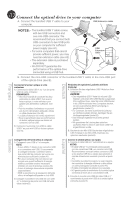
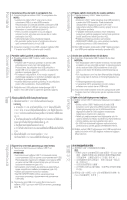
02 Connect the optical drive to your computer A. Connect the bundled USB Y cable to your computer. USB Extension cable Français NOTES: • The bundled USB Y cable comes with two USB connectors and one mini-USB connector. We recommend that you connect both USB connectors to two USB ports on your computer for sufficient power supply (see A1). • For some computers that cannot provide sufficient power, you may need an extension cable (see A2). • The extension cable is purchased separately. • We DO NOT guarantee the performance of the optical drive connected using a USB hub. ON OFF A1 A2 OFF ON USB Extension cable A2 B B. Connect the mini-USB connector of the bundled USB Y cable to the mini-USB port of the optical drive (see B). Deutsch Connectez le lecteur optique à votre ordinateur. A. Connectez le câble USB Y sur l'un des ports USB de votre ordinateur. REMARQUES: • Il est recommandé de connecter les deux extrémités du câble USB Y, livré avec le lecteur optique, à votre ordinateur pour garantir une alimentation suffisante. (Voir A1). • Pour les modèles d'ordinateurs ne pouvant pas fournir l'alimentation adéquate, utilisez un câble d'extension (Voir A2). • Le câble d'extension est vendu séparément. • Nous ne garantissons pas les performances du lecteur optique lorsque ce dernier est connecté à un hub USB. B. Connectez l'extrémité mini-USB du câble USB Y au port mini-USB du lecteur optique (Voir B). Verbinden des optischen Laufwerks mit Ihren Computer. A. Schließen Sie das mitgelieferte USB Y-Kabel an Ihren Computer an. HINWEISE: • Das mitgelieferte USB Y-Kabel ist mit zwei USBSteckern und einem Mini-USB-Stecker ausgerüstet. Wir empfehlen Ihnen, dass Sie beide USB-Stecker in die USB-Anschlüsse Ihres Computers stecken, um eine ausreichende Stromversorgung zu gewährleisten (siehe A1). • Für Computer, die keine ausreichende Leistung zur Verfügung stellen können, benötigen Sie ein Verlängerungskabel (siehe A2). • Das Verlängerungskabel muss extra gekauft werden. • Wir garantieren die Leistung des optischen Laufwerks NICHT, wenn es über einen USB-Hub angeschlossen wurde. B. Stecken sie den Mini-USB-Stecker des mitgelieferten USB Y-Kabels in den Mini-USB-Anschluss des optischen Laufwerks (siehe B). Español Collegamento dell'unità ottica al computer. A. Collegare il cavo USB a Y al computer. NOTE: • Il cavo USB a Y dotato di due connettori USB e un connettore mini USB. Si raccomanda di collegare entrambi i connettori USB a due porte USB de computer per avere una alimentazione sufficiente (vedere A1). • Per alcuni computer che non riescono ad erogare una quantit sufficiente di energia elettrica, potrebbe rendersi necessario utilizzare un cavo di prolunga (vedere A2). • Il cavo di prolunga deve essere acquistato separatamente. • NON si garantiscono le prestazioni dell'unità ottica, se collegata utilizzando un hub USB. B. Collegare il connettore mini USB del cavo USB a Y in dotazione alla porta mini USB dell'unità ottica (vedere B). Conecte la unidad óptica a su equipo. A. Conecte el cable USB en Y suministrado a su equipo. NOTAS: • El cable USB en Y suministrado está equipado con dos conectores USB y un conector mini-USB. Recomendamos conectar ambos conectores USB a dos puertos USB de su equipo para alcanzar el nivel de alimentación necesario (consulte el punto A1). • Es posible que algunos equipos no sean capaces de suministrar la energía suficiente y deba utilizar un cable prolongador (consulte el punto A2). • El cable prolongador se adquiere por separado. • NO garantizamos el rendimiento de la unidad óptica conectada a través de un concentrador USB. B. Conecte el conector mini-USB del cable USB en Y suministrado al puerto mini-USB de la unidad óptica (consulte el punto B). Italiano
-
 1
1 -
2
-
3
-
4
-
5
-
6
-
7
-
 8
8 -
 9
9 -
 10
10 -
 11
11 -
 12
12 -
 13
13 -
 14
14 -
 15
15 -
 16
16 -
 17
17 -
 18
18 -
19
-
20
-
21
-
22
-
23
-
24
-
25
-
26
-
27
-
28
-
29
-
30
-
31
-
32
-
33
-
34
-
35
-
36
-
37
-
38
-
39
-
40
 |
 |
