Asus TS300-E5 User Guide - Page 165
Fast Init erases the Master Boot Record MBR of the physical
 |
UPC - 610839652525
View all Asus TS300-E5 manuals
Add to My Manuals
Save this manual to your list of manuals |
Page 165 highlights
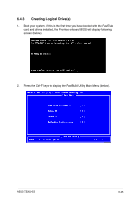
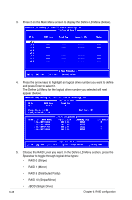
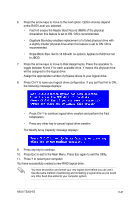
6. Press the arrow keys to move to the next option. Option choices depend onthe RAID Level you selected. • Fast Init erases the Master Boot Record (MBR) of the physical driveswhen this feature is set to ON. ON is recommended. • Gigabyte Boundary enables replacement of a failed physical drive with a slightly smaller physical drive when this feature is set to ON. ON is recommended. • Stripe Block Size. Set to 16 KB with no options. Applies to RAID but not to JBOD. 7. Press the arrow keys to move to Disk Assignments. Press the spacebar to toggle between N and Y for each available drive. Y means this physical drive will be assigned to the logical drive. Assign the appropriate number of physical drives to your logical drive. 8. Press Ctrl-Y to save your logical drive configuration. If you set Fast Init to ON, the following message displays: • Press Ctrl-Y to continue logical drive creation and perform the Fast Initialization. • Press any other key to cancel logical drive creation. The Modify Array Capacity message displays: 9. Press any key to continue. 10. Press Esc to exit to the Main Menu. Press Esc again to exit the Utility. 11. Press Y to restart your computer. You have successfully created a new RAID logical drive. You must be partition and format your new logical drive before you can use it. Use the same method of partitioning and formatting a logical drive as you would any other fixed disk added to your computer system. ASUS TS300-E5 6-47
-
 1
1 -
2
-
3
-
4
-
5
-
6
-
7
-
8
-
9
-
10
-
11
-
12
-
13
-
14
-
15
-
16
-
17
-
18
-
19
-
20
-
21
-
22
-
23
-
24
-
25
-
26
-
27
-
28
-
29
-
30
-
31
-
32
-
33
-
34
-
35
-
36
-
37
-
38
-
39
-
40
-
41
-
42
-
43
-
44
-
45
-
46
-
47
-
48
-
49
-
50
-
51
-
52
-
53
-
54
-
55
-
56
-
57
-
58
-
59
-
60
-
61
-
62
-
63
-
64
-
65
-
66
-
67
-
68
-
69
-
70
-
71
-
72
-
73
-
74
-
75
-
76
-
77
-
78
-
79
-
80
-
81
-
82
-
83
-
84
-
85
-
86
-
87
-
88
-
89
-
90
-
91
-
92
-
93
-
94
-
95
-
96
-
97
-
98
-
99
-
100
-
101
-
102
-
103
-
104
-
105
-
106
-
107
-
108
-
109
-
110
-
111
-
112
-
113
-
114
-
115
-
116
-
117
-
118
-
119
-
120
-
121
-
122
-
123
-
124
-
125
-
126
-
127
-
128
-
129
-
130
-
131
-
132
-
133
-
134
-
135
-
136
-
137
-
138
-
139
-
140
-
141
-
142
-
143
-
144
-
145
-
146
-
147
-
148
-
149
-
150
-
151
-
152
-
153
-
154
-
155
-
156
-
157
-
158
-
159
-
 160
160 -
 161
161 -
 162
162 -
 163
163 -
 164
164 -
 165
165 -
 166
166 -
 167
167 -
 168
168 -
 169
169 -
 170
170 -
171
-
172
-
173
-
174
-
175
-
176
-
177
-
178
-
179
-
180
-
181
-
182
-
183
-
184
-
185
-
186
-
187
-
188
-
189
-
190
-
191
-
192
-
193
-
194
-
195
-
196
-
197
-
198
-
199
-
200
-
201
-
202
-
203
-
204
-
205
-
206
-
207
-
208
 |
 |
