Belkin F1UP0301 F1UP0301 Manual - Page 24
Click OK to close. In the Belkin Port 2: Properties window
 |
View all Belkin F1UP0301 manuals
Add to My Manuals
Save this manual to your list of manuals |
Page 24 highlights
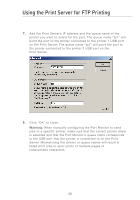
Printing to Multiple Print Servers 7. On the "Available Servers" window, select the Print Server to which you want to print. 8. Click "OK" to close. In the "Belkin Port 2: Properties" window, the name of the Print Server you selected will appear in the window. 9. Click "OK" to close. 10. Repeat these steps for each additional Print Server on your network. Warning: When configuring the Port Monitor to send jobs to a specific Print Server, make sure that the correct port is selected for the printer driver in Windows and that the corresponding printer is actually connected to the Print Server that the port is indicating. Mismatching printer drivers, ports, and Print Servers will result in failed print jobs or error prints of multiple pages of indiscernible characters. 22
-
 1
1 -
2
-
3
-
4
-
5
-
6
-
7
-
8
-
9
-
10
-
11
-
12
-
13
-
14
-
15
-
16
-
17
-
18
-
 19
19 -
 20
20 -
 21
21 -
 22
22 -
 23
23 -
 24
24 -
 25
25 -
 26
26 -
 27
27 -
 28
28 -
 29
29 -
30
-
31
-
32
-
33
-
34
-
35
-
36
-
37
-
38
-
39
-
40
 |
 |
