Belkin F5D6230-3 User Manual - Page 32
Configuring Network Settings on your Mac
 |
View all Belkin F5D6230-3 manuals
Add to My Manuals
Save this manual to your list of manuals |
Page 32 highlights
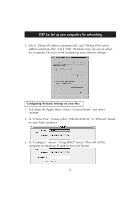
STEP 3a: Set up your computers for networking 5. Select "Obtain IP address automatically" and "Obtain DNS server address automatically". Click "OK". Windows may ask you to restart the computer. Do so to finish configuring your network settings. Configuring Network Settings on your Mac 1. Pull down the Apple Menu. Select "Control Panels" and select "TCP/IP". 2. At "Connect Via:" choose either "Ethernet Built In" or "Ethernet" based on your Mac's interface. 3. At "Configure": choose "Using DHCP Server". This will tell the computer to obtain an IP address from the Router. 31
-
 1
1 -
2
-
3
-
4
-
5
-
6
-
7
-
8
-
9
-
10
-
11
-
12
-
13
-
14
-
15
-
16
-
17
-
18
-
19
-
20
-
21
-
22
-
23
-
24
-
25
-
26
-
 27
27 -
 28
28 -
 29
29 -
 30
30 -
 31
31 -
 32
32 -
 33
33 -
 34
34 -
 35
35 -
 36
36 -
 37
37 -
38
-
39
-
40
-
41
-
42
-
43
-
44
-
45
-
46
-
47
-
48
-
49
-
50
-
51
-
52
-
53
-
54
-
55
-
56
-
57
-
58
-
59
-
60
-
61
-
62
-
63
-
64
-
65
-
66
-
67
-
68
-
69
-
70
-
71
 |
 |

31
STEP 3a: Set up your computers for networking
5. Select “Obtain IP address automatically” and “Obtain DNS server
address automatically”. Click “OK”. Windows may ask you to restart
the computer. Do so to finish configuring your network settings.
Configuring Network Settings on your Mac
1. Pull down the Apple Menu. Select “Control Panels” and select
“TCP/IP”.
2. At “Connect Via:” choose either “Ethernet Built In” or “Ethernet” based
on your Mac’s interface.
3.
At “Configure”: choose “Using DHCP Server”. This will tell the
computer to obtain an IP address from the Router.