Belkin F5U021V User Manual - Page 6
Initial Driver Installation, Cable-Association Procedure - power supply
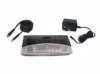 |
UPC - 722868554241
View all Belkin F5U021V manuals
Add to My Manuals
Save this manual to your list of manuals |
Page 6 highlights
Installation Initial Driver Installation 1 1. Insert the Belkin driver-installation CD into your CD drive. After a few moments, the setup application should 2 appear on your computer screen. Note: If the setup application does not appear, double-click 3 "My Computer", and then click your CD-drive icon. This will load the setup-applications main page. 4 2. Click the "Install Driver" button. 3. The driver installer will launch. Click "Next". 5 4. Accept the license agreement. Then, click "Next". 5. Enter a user name, if desired. Then, click "Next". 6 6. Click "Next" to accept the default folder location; or select "Change" to specify an alternate folder location. 7. Click "Install". 8. Click "Finish" to complete the driver-install process. 9. The Wireless USB Control Center will now be displayed on your Windows desktop. Leave the Control Center open on your Windows desktop and proceed to the "Cable-Association Procedure" below.* Note for Windows Vista Users: You must open the Wireless USB Control Center manually. Double-click the "Wireless USB Control Center" icon found in the Windows system tray, which is located in the bottom, right-hand corner of the Windows desktop. 6 Installation Cable-Association Procedure 1 When you initially install the Hub, you must "associate" it with the host computer. To do this, connect the Hub to your computer using the provided USB cable. This "cable 2 association" procedure allows the computer and Hub to share information that is used to establish a secure wireless connection. 3 1. Plug the power supply into the wall, and then plug the DC connector into the Hub. 4 2. Attach the Hub to your computer using a standard USB cable (mini-B to USB-A connector). 5 a. Plug the "Mini B" connector into the port next to the Hub antenna. 6 b. Plug the "USB A" connector into a USB port on the host computer. c. After a few moments, the Windows "Found New Hardware Wizard" will launch.* Note for Windows Vista Users: You will not see the dialog noted in step 3. Proceed to step 4. 3. There are four separate drivers to install in this step: a. Belkin Cable Association Device b. Belkin Cable Association RCI Device c. Belkin Cable Association DFU Interface d. Belkin Cable Association Interface 7
-
 1
1 -
 2
2 -
 3
3 -
 4
4 -
 5
5 -
 6
6 -
 7
7 -
 8
8 -
 9
9 -
 10
10 -
 11
11 -
 12
12 -
13
-
14
-
15
-
16
-
17
 |
 |
