BenQ PW9500 DLP Projector User Manual - Page 61
lamp modules., Ensure the handle is fully locked in place.
 |
View all BenQ PW9500 DLP Projector manuals
Add to My Manuals
Save this manual to your list of manuals |
Page 61 highlights
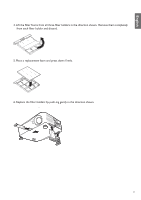
English 5. Reverse steps 1 to 3 to install the new lamp module(s). new Lamp 8. Replace the lamp cover. close the lamp cover (A) and lock attached screws (B). A B 6.Tighten the screw securing the lamp box. Reconnect the lamp connector. 7. Ensure the handle is fully locked in place. 9.Tighten the screws on the lamp cover. 10. Reapply power and turn the projector back on. Please be careful to not over-tighten the screws. Loose screws may cause a bad connection, which could result in malfunction. 61
-
 1
1 -
2
-
3
-
4
-
5
-
6
-
7
-
8
-
9
-
10
-
11
-
12
-
13
-
14
-
15
-
16
-
17
-
18
-
19
-
20
-
21
-
22
-
23
-
24
-
25
-
26
-
27
-
28
-
29
-
30
-
31
-
32
-
33
-
34
-
35
-
36
-
37
-
38
-
39
-
40
-
41
-
42
-
43
-
44
-
45
-
46
-
47
-
48
-
49
-
50
-
51
-
52
-
53
-
54
-
55
-
 56
56 -
 57
57 -
 58
58 -
 59
59 -
 60
60 -
 61
61 -
 62
62 -
 63
63 -
 64
64 -
 65
65 -
 66
66 -
67
-
68
-
69
-
70
-
71
-
72
-
73
-
74
-
75
-
76
-
77
-
78
 |
 |

61
English
9. Tighten the screws on the lamp cover.
10. Reapply power and turn the projector
back on.
6. Tighten the screw securing the lamp box.
Reconnect the lamp connector.
Please be careful to not over-tighten the screws.
Loose screws may cause a bad connection, which could
result in malfunction.
5. Reverse steps 1 to 3 to install the new
lamp module(s).
new Lamp
7. Ensure the handle is fully locked in place.
8. Replace the lamp cover.
close the lamp cover (A) and lock attached
screws (B).
B
A