Beretta Cx4 Storm Beretta CX4 Storm User Manual - Page 36
Fig. 25, Fig. 26, CAUTION, Fig.1/2-G - stock spacer
 |
View all Beretta Cx4 Storm manuals
Add to My Manuals
Save this manual to your list of manuals |
Page 36 highlights
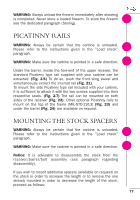
• Remove the rubber recoil pad from the rear of the stock (Fig. 25). • Unscrew in a counter clockwise direction the rear screw from the stock with a 7 mm blade screwdriver (Fig. 26). • Completely remove the screw. • Remove the mounted spacer if you wish to shorten the stock or add more spacers (available on request) to lengthen the stock. CAUTION: once the screw has been removed from the stock, the rear sling swivel (Fig.1/2-G) is not fixed to the stock. Take care not to lose it. • To remount the screw make sure to correctly centre the screw with the respective seat of the sling swivel. • Using the screwdriver, completely screw and tighten the screw in a clockwise direction on the stock. • Reassemble the rubber recoil pad. 78
-
 1
1 -
2
-
3
-
4
-
5
-
6
-
7
-
8
-
9
-
10
-
11
-
12
-
13
-
14
-
15
-
16
-
17
-
18
-
19
-
20
-
21
-
22
-
23
-
24
-
25
-
26
-
27
-
28
-
29
-
30
-
 31
31 -
 32
32 -
 33
33 -
 34
34 -
 35
35 -
 36
36 -
 37
37 -
 38
38 -
 39
39 -
 40
40 -
 41
41 -
42
-
43
-
44
-
45
-
46
-
47
 |
 |

78
•Remove the rubber recoil pad from the rear of the stock
(Fig. 25)
.
•Unscrew in a counter clockwise direction the rear screw from
the stock with a 7 mm blade screwdriver
(Fig. 26)
.
•Completely remove the screw.
• Remove the mounted spacer if you wish to shorten the stock
or add more spacers (available on request) to lengthen the
stock.
CAUTION:
once the screw has been removed from the stock, the
rear sling swivel
(Fig.1/2-G)
is not fixed to the stock. Take care
not to lose it.
•To remount the screw make sure to correctly centre the screw
with the respective seat of the sling swivel.
• Using the screwdriver, completely screw and tighten the screw
in a clockwise direction on the stock.
• Reassemble the rubber recoil pad.