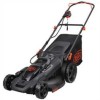
Black & Decker CM2045 Instruction Manual - Page 9
Warning, Caution
 |
View all Black & Decker CM2045 manuals
Add to My Manuals
Save this manual to your list of manuals |
Page 9 highlights
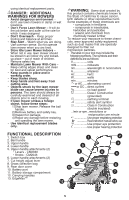
• Open the battery port cover (15) as described above. • Depress the battery release button (17) on the battery pack and pull battery pack out of tool as shown in figure D. BATTERY STORAGE D 17 An extra battery can be stored using the battery storage compartment (11). • Lift the storage compartment cover and slide the battery into the compartment as shown in Figure E. Battery in this AScoSmEpaMrtBmLenYt will not actuate the mower. E CAUTION: Ensure each side of the lower handle is set on the same number. The arrow must be lined up with 1, 2, or 3 for operation. • Close the handle height adjust levers (7) as shown in Figure F. As you close each, make sure the teeth are engaged as shown in Figure G. • If the connection between the handle and lever is too tight or loose, open the lever and adjust the depth of the lever by turning the lever. Close it again until the teeth are fully clasped and each lever stays securely closed. ATTACHING UPPER HANDLE (Figure H) F 19 4 18 7 G This product can accept any of the batteries and chargers listed in the chart below. LI-ION Battery Packs and Chargers Description Cat. # Batteries: LI-ION LBX36 LBX1540 LBX2040 LBX2540 LBXR36 LBXR2036 Chargers: LI-ION LCS36 LCS40 LCS436 WARNING: Before assembly, make sure the bail handle is released and the safety key is removed. • Remove the upper-handle attachment levers or knobs (5), nuts (20), and washers (21) from the handle. • Line up the holes on the bottom of the upper handle (3) with the holes on the top of the lower handle (4). H 5 21 3 20 ATTACHING LOWER HANDLE • Lift lower handle (4) into place making 4 sure the arrow (18) on the base of the mower lines up with 1, 2, or 3 on the base of the handle (19) (inset of Figure F) 9 NOTE: Make sure the cord is located on
-
 1
1 -
2
-
3
-
 4
4 -
 5
5 -
 6
6 -
 7
7 -
 8
8 -
 9
9 -
 10
10 -
 11
11 -
 12
12 -
 13
13 -
 14
14 -
15
-
16
-
17
-
18
-
19
-
20
-
21
-
22
-
23
-
24
-
25
-
26
-
27
-
28
-
29
-
30
-
31
-
32
-
33
-
34
-
35
-
36
-
37
-
38
-
39
-
40
-
41
-
42
-
43
-
44
-
45
-
46
-
47
-
48
-
49
-
50
-
51
-
52
-
53
-
54
-
55
-
56
 |
 |
