4
Installation instructions
18
. .
.
.
.
.
.
.
.
.
.
.
.
.
.
.
.
.
.
.
. . . .
. . . . . . . . . . . . . .
. . . . .
. . . . .
. . . . .
. . . . . . . . . . . . . .
.
.
.
1.
Checking
the
installation
cavity
18
.
.
.
.
.
.
.
.
. . . . . . . . . . . . . . . . .
. . . . .
. . . . .
. . . . . . . . . . . . . .
. . . . .
.
.
.
.
2..
Transport
of
the
appliance
18
.
.
.
.
.
.
.
.
.
.
.
.
. .
. . . . .
. . . . .
. . . . . . . . . . . . . . . . . . .
. . . . .
. . . . .
. . . . . .
.
.
.
3.
Removing
the
packaging
19
.
.
.
.
.
.
.
.
.
.
.
.
. . . .
. . . . .
. . . . .
. . . . . . . . . . . . . . . . . . .
. . . . .
. . . . .
. . . . .
.
.
.
4.
Preparing
the
appliance
19
.
.
.
.
.
.
.
.
.
.
.
.
.
.
.
. . . . . . . . .
. . . . .
. . . . .
. . . . . . . . . . . . . .
. . . . .
. . . . .
. . . .
.
.
.
5.
Changing
over
the
door
hinges
20
.
.
.
.
.
.
.
. .
. . . . .
. . . . .
. . . . . . . . . . . . . .
. . . . .
. . . . .
. . . . . . . . . . . .
.
.
.
6.
Preparing
the
installation
cavity
22
.
.
.
.
.
.
.
. . . . . . . . . . .
. . . . .
. . . . .
. . . . .
. . . . . . . . . . . . . .
. . . . .
. . .
.
.
.
7.
Attaching
an
alternative
antiĆtip
device
24
.
.
. . . . . . . . . . .
. . . . .
. . . . .
. . . . . . . . . . . . . . . . . . .
. . . . . . .
.
.
.
8.
Preparing
to
connect
the
water
24
.
.
.
.
.
.
.
.
. . . . .
. . . . .
. . . . . . . . . . . . . . . . . . .
. . . . .
. . . . .
. . . . . . . .
.
.
.
9.
Attaching
the edge
protection
25
.
.
.
.
.
.
.
.
. . . . . . . . . . . . . . . . . . .
. . . . .
. . . . .
. . . . . . . . . . . . . . . . . . .
.
.
.
10.SideĆbyĆSide
installation
25
.
.
.
.
.
.
.
.
.
.
.
.
.
.
.
.
. . . . . . . . . . . . . . . . . . .
. . . . .
. . . . . . . . . . . . . . . . . . . . . .
.
.
.
11. Pushing
the
appliance
into
the
installation
cavity
25
. . . .
. . . . .
. . . . . . . . . . . . . .
. . . . .
. . . . .
. . . . .
. . .
.
.
.
12. Installing
and
aligning
the
appliance
26
.
.
.
. . . . . . . . . .
. . . . .
. . . . .
. . . . .
. . . . . . . . . . . . . .
. . . . .
. . . .
.
.
.
13. Attaching
the
appliance
to
the
top
of
the
cavity
27
.
. . . . .
. . . . . . . . . . . . . . . . . . .
. . . . .
. . . . .
. . . . .
. .
.
.
.
14. Attaching
the
individual
appliance
to
the
side
of
the±cavity
28
. . . .
. . . . .
. . . . .
. . . . . . . . . . . . . .
. . . . .
.
.
.
15. Connecting
the
water
to
the
appliance
28
.
.
. . . . . . . . . . .
. . . . .
. . . . .
. . . . . . . . . . . . . .
. . . . .
. . . . .
. .
.
.
.
16. Attaching
the
toe
kick
panel
29
.
.
.
.
.
.
.
.
.
.
.
. . . . . . . . . . . . .
. . . . .
. . . . .
. . . . . . . . . . . . . . . . . . .
. . . . .
.
.
.
17. Commissioning
the
Appliance
30
.
.
.
.
.
.
.
.
.
.
. . . . .
. . . . . . . . . . . . . . . . . . .
. . . . .
. . . . .
. . . . . . . . . . . .
.
.
.
18. Preparing
the furniture
doors
31
.
.
.
.
.
.
.
.
.
. . . . . .
. . . . .
. . . . .
. . . . . . . . . . . . . .
. . . . .
. . . . .
. . . . .
. . .
.
.
.
19. Loading
the
appliance
door
32
.
.
.
.
.
.
.
.
.
.
.
. . . . . . . . . . .
. . . . .
. . . . .
. . . . .
. . . . . . . . . . . . . .
. . . . .
. .
.
.
.
20. Attaching
the adjusting
rail
to±the
furniture
door
32
. . . . . . . . . . . . . . . . . .
. . . . .
. . . . .
. . . . . . . . . . . . . .
.
.
.
21. Attaching
and
aligning
the±furniture
door
33
. . . . .
. . . . . . . . . . . . . .
. . . . .
. . . . .
. . . . . . . . . . . . . . . . . .
.
.
.
22. Attaching
the furniture
door
34
.
.
.
.
.
.
.
.
.
.
. .
. . . . .
. . . . . . . . . . . . . . . . . . .
. . . . .
. . . . . . . . . . . . . . . . .
.
.
.
23. Shorten
the
finger
guard
36
.
.
.
.
.
.
.
.
.
.
.
.
.
. . .
. . . . .
. . . . .
. . . . . . . . . . . . . .
. . . . .
. . . . .
. . . . .
. . . . . .
.
.
.
24. Attaching
the
finger
guard
36
.
.
.
.
.
.
.
.
.
.
.
.
.
. . .
. . . . .
. . . . .
. . . . . . . . . . . . . .
. . . . .
. . . . .
. . . . . . . . . .
.
.
.
25. Attaching
the
covers
37
.
.
.
.
.
.
.
.
.
.
.
.
.
.
.
.
. . . . .
. . . . . . . . . . . . . .
. . . . .
. . . . . . . . . . . . . . . . . . . . . . . .
.
.
.
26. Aligning
the iceĆwater
dispenser
38
.
.
.
.
.
.
.
.
. . . . .
. . . . . . . . . . . . . .
. . . . .
. . . . .
. . . . . . . . . . . . . . . . .
.
.
.
27. Attaching
the cover
frame
and
the
shelf
39
. . . . . . . . .
. . . . .
. . . . .
. . . . .
. . . . . . . . . . . . . .
. . . . .
. . . . .
.
.
.
28. Attaching
the
cover
strips
39
.
.
.
.
.
.
.
.
.
.
.
.
.
.
. . . . .
. . . . . . . . . . . . . . . . . . .
. . . . .
. . . . .
. . . . . . . . . . . .
.
.
.
29. Mounting
of
air
separator
40
.
.
.
.
.
.
.
.
.
.
.
.
.
. . . . . . .
. . . . .
. . . . .
. . . . . . . . . . . . . .
. . . . .
. . . . .
. . . . .
.
.
.
.
30. Adjusting
the
door
opening
angle
41
.
.
.
.
.
. . . . .
. . . . .
. . . . .
. . . . . . . . . . . . . .
. . . . .
. . . . .
. . . . .
. . . .
.
.
.
31. Changing
the
door
spring
41
.
.
.
.
.
.
.
.
.
.
.
.
. . . . . . . . . . . . . .
. . . . .
. . . . .
. . . . . . . . . . . . . .
. . . . .
. . . . .
.
.
.
 1
1 2
2 3
3 4
4 5
5 6
6 7
7 8
8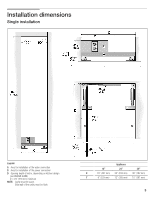 9
9 10
10