Bosch HGS7052UC Use & Care Manual - Page 8
Parts and Accessories - model #
 |
UPC - 825225843917
View all Bosch HGS7052UC manuals
Add to My Manuals
Save this manual to your list of manuals |
Page 8 highlights
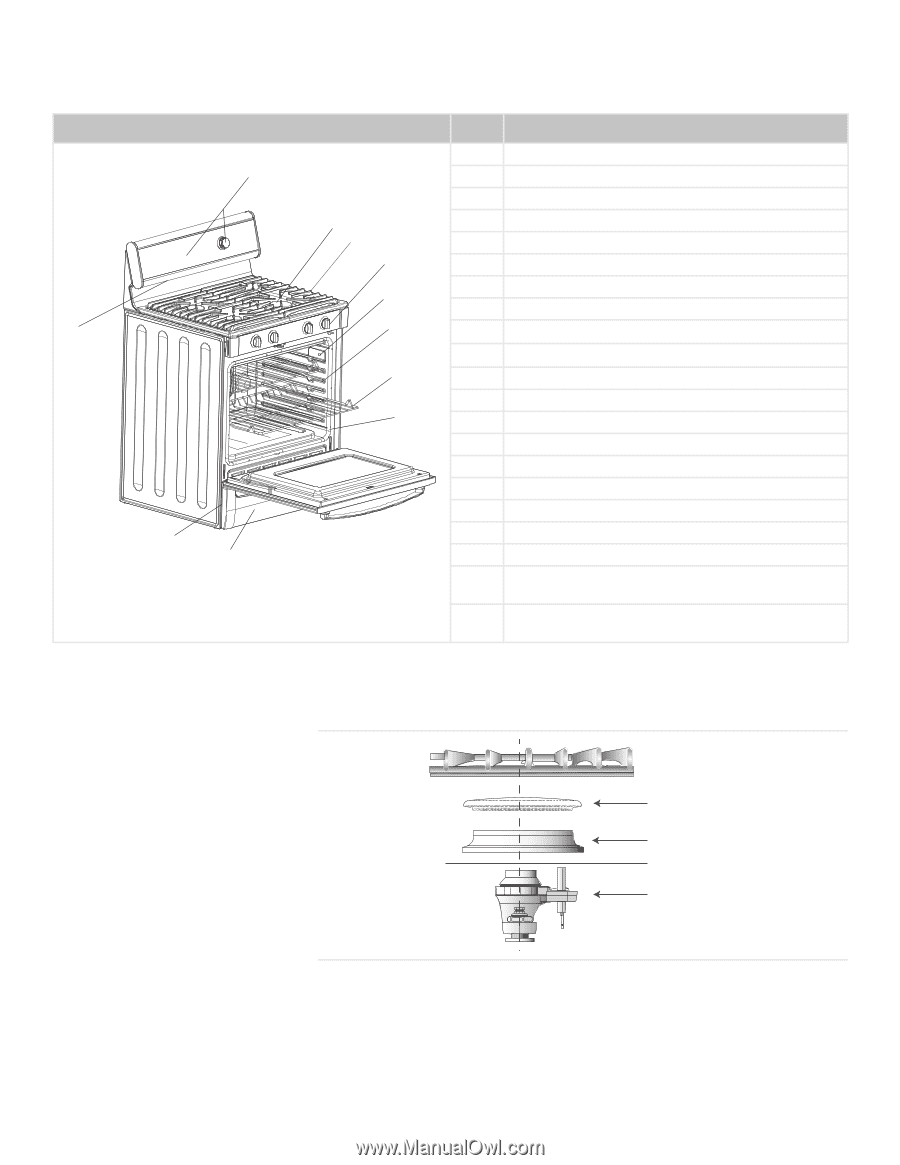
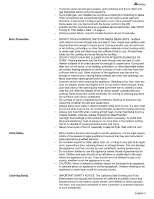
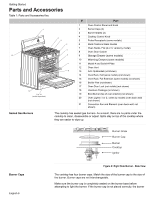
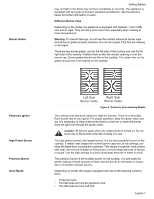
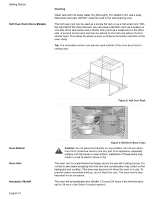
Getting Started Parts and Accessories Table 1: Parts and Accessories Key 1 2 3 4 5 12 6 7 8 11 9 or 10 (model dependent) # Part 1 Oven Control Panel and Knob 2 Burner Caps (4) 3 Burner Grates (2) 4 Cooktop Control Knob 5 Probe Receptacle (some models) 6 Rack Positions/ Rack Guides 7 Oven Racks, Flat (2 or 3; varies by model) 8 Oven Door Gasket 9 Storage Drawer (some models) 10 Warming Drawer (some models) 11 Model # and Serial # Plate 12 Oven Vent 13 Anti-Tip Bracket (not shown) 14 Oven Rack, Half (some models) (not shown) 15 Oven Rack, Full Extension (some models) (not shown) 16 Broiler Pan (not shown) 17 Oven Door Lock (not visible) (not shown) 18 Literature Package (not shown) 19 Broil Burner (top of oven interior) (not shown) 20 Oven Lights (1 or 2; varies by model) (oven back wall) (not shown) 21 Convection Fan and Element (oven back wall; not shown) Sealed Gas Burners The cooktop has sealed gas burners. As a result, there are no parts under the cooktop to clean, disassemble or adjust. Spills stay on top of the cooktop where they are easier to wipe up. Burner Grate Burner Cap Burner Cooktop Ignitor Burner Caps English 6 Figure 2: Right Side Burner - Side View The cooktop has four burner caps. Match the size of the burner cap to the size of the burner. Burner caps are not interchangeable. Make sure the burner cap is completely seated on the burner base before attempting to light the burner. If the burner cap is not placed correctly, the burner
-
 1
1 -
2
-
 3
3 -
 4
4 -
 5
5 -
 6
6 -
 7
7 -
 8
8 -
 9
9 -
 10
10 -
 11
11 -
 12
12 -
 13
13 -
14
-
15
-
16
-
17
-
18
-
19
-
20
-
21
-
22
-
23
-
24
-
25
-
26
-
27
-
28
-
29
-
30
-
31
-
32
-
33
-
34
-
35
-
36
-
37
-
38
-
39
-
40
-
41
-
42
-
43
-
44
-
45
-
46
-
47
-
48
 |
 |