Bosch WTB86200UC Instructions for Use - Page 26
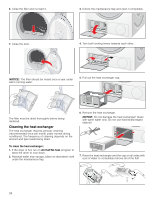
Cleaning the heat exchanger
 |
View all Bosch WTB86200UC manuals
Add to My Manuals
Save this manual to your list of manuals |
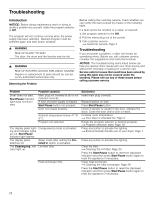
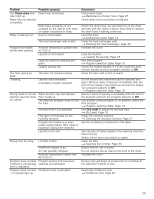
Page 26 highlights
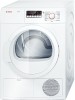
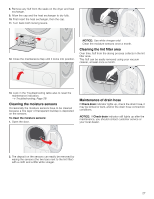
6. Close the filter and re-insert it. 3. Unlock the maintanance flap and open it completely. 7. Close the door. 4. Turn both locking levers towards each other. NOTICE: The filter should be rinsed once a year under warm running water. 5. Pull out the heat exchanger cap. The filter must be dried thoroughly before being replaced. Cleaning the heat exchanger The heat exchanger requires periodic cleaning (recommended once per month under normal drying conditions). The frequency of cleaning depends on the amount and type loads being dried. 6. Remove the heat exchanger. NOTICE: Do not damage the heat exchanger! Clean with warm water only. Do not use hard/sharp-edged objects! To clean the heat exchanger: 1. If the dryer is hot, run on Air fluff/No heat program to allow the dryer to cool down. 2. Residual water may escape, place an absorbent cloth under the maintanance flap. 7. Rinse the heat exchanger and the cap on all sides with a jet of water to completely remove all of the fluff. 26
-
 1
1 -
2
-
3
-
4
-
5
-
6
-
7
-
8
-
9
-
10
-
11
-
12
-
13
-
14
-
15
-
16
-
17
-
18
-
19
-
20
-
 21
21 -
 22
22 -
 23
23 -
 24
24 -
 25
25 -
 26
26 -
 27
27 -
 28
28 -
 29
29 -
 30
30 -
 31
31 -
32
 |
 |
