Bosch WTB86200UC Instructions for Use - Page 8
Dimensions and clearances required
 |
View all Bosch WTB86200UC manuals
Add to My Manuals
Save this manual to your list of manuals |
Page 8 highlights
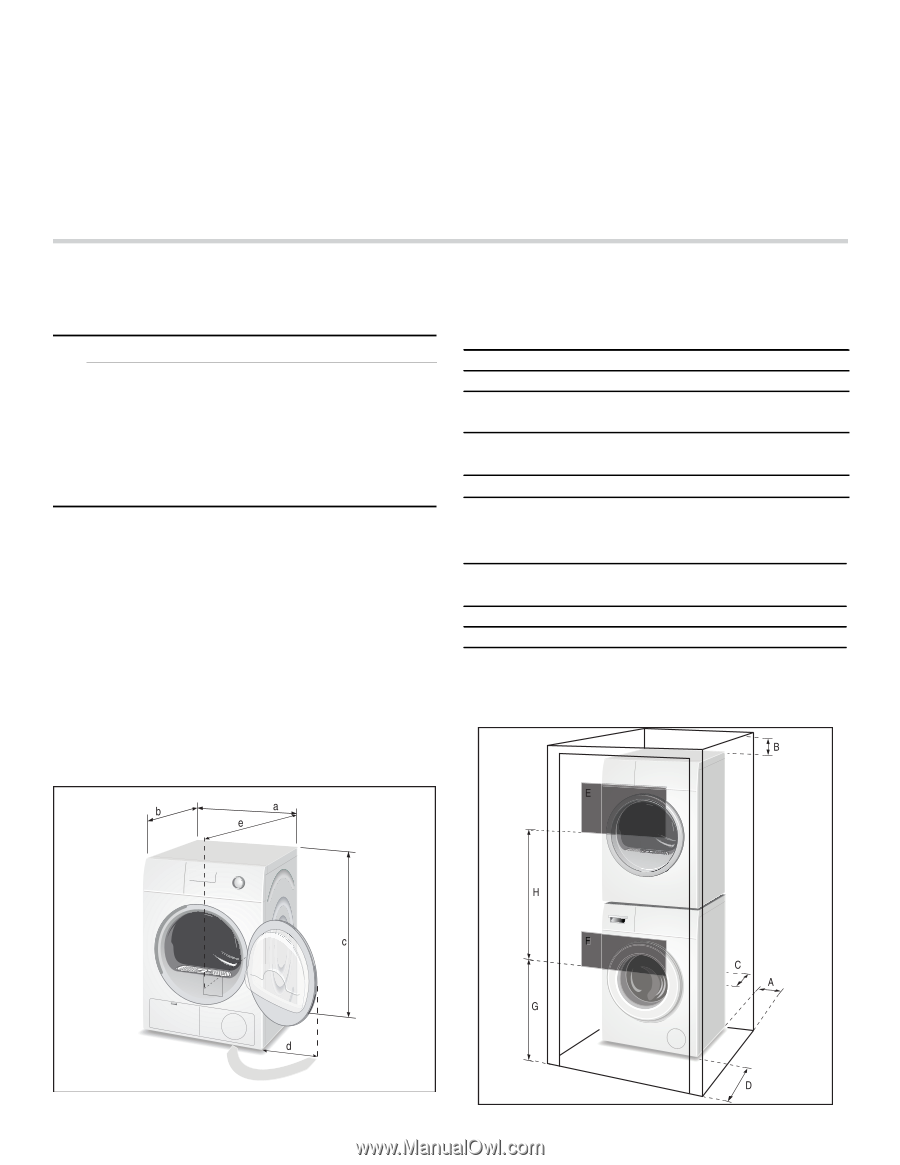
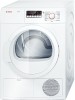
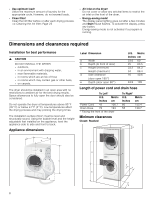
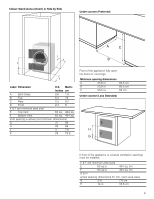
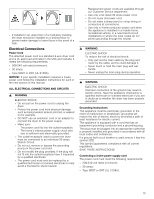
▯ Use optimum load! Utilize the maximum amount of laundry for the appropriate cycle. However, do not exceed loads. ▯ Clean filter! Clean the lint filter before or after each drying process. ~ Cleaning the lint filter; Page 25 ▯ Air inlet on the dryer! Do not cover or allow any articles/items to restrict the air inlet on the front of the dryer. ▯ Energy-saving mode! The display panel lighting goes out after a few minutes and Start/Pause flashes. To activate the display, press any button. Energy-saving mode is not activated if a program is running. Dimensions and clearances required Installation for best performance 9 CAUTION DO NOT INSTALL THE DRYER: ▯ outdoors, ▯ in an environment with dripping water, ▯ near flammable materials, ▯ in rooms which are at risk of frost, ▯ in rooms which may contain gas or other fuels, ▯ on carpets. The dryer should be installed in an open area with no restrictions to ambient air for the best drying results. Space allowances to fully open the door should also be considered. Do not operate the dryer at temperatures above 95°F (35°C) or below 41°F (5°C). Low temperatures affect the drying process and may prolong the drying times. The installation surface (floor) must be level and structurally sound. Using the bubble level and the heightadjustable feet installed on the appliance, level the appliance side to side and front to back. Appliance dimensions E D H Label Dimension a Width b Depth (to front of door) c Height (minimum) Height (maximum) d Side clearance (door open 180°) e Depth (door open 90°) U.S. Metric Inches cm 23.6 60 25 63.5 33.2 84.3 34 86.4 16 40.6 42.9 109 Length of power cord and drain hose To Left* U.S. Metric Inches cm Power Cord 42 106.7 Drain Hose 76 193 * Facing the front of the dryer To Right* U.S. Metric Inches cm 60 152.4 55 139.7 Minimum clearances Closet: Stacked % ( + F G ) * & $ ' 8
-
 1
1 -
2
-
 3
3 -
 4
4 -
 5
5 -
 6
6 -
 7
7 -
 8
8 -
 9
9 -
 10
10 -
 11
11 -
 12
12 -
 13
13 -
14
-
15
-
16
-
17
-
18
-
19
-
20
-
21
-
22
-
23
-
24
-
25
-
26
-
27
-
28
-
29
-
30
-
31
-
32
 |
 |