Bosch WTMC5521UC Operating, Care, Installation (all languages) - Page 19
Cleaning
 |
View all Bosch WTMC5521UC manuals
Add to My Manuals
Save this manual to your list of manuals |
Page 19 highlights
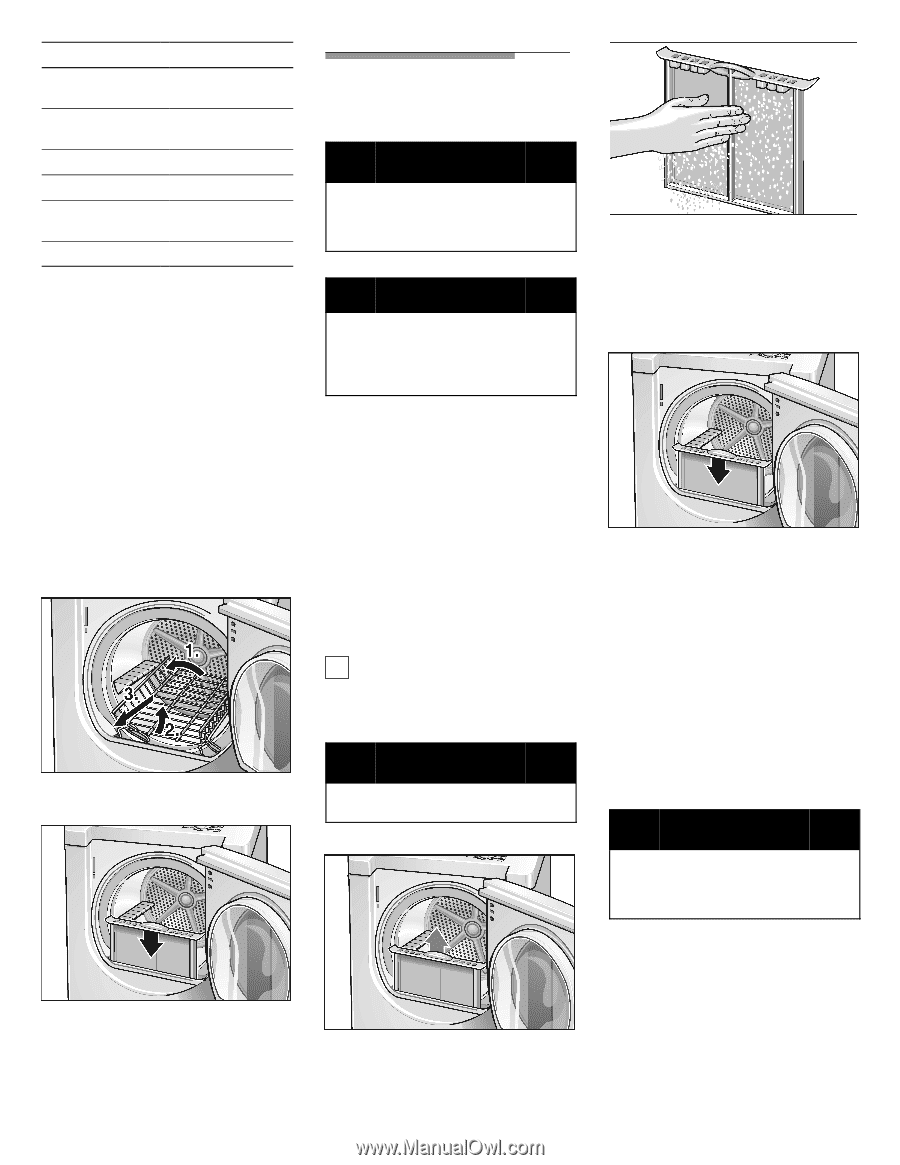
Laundry type Required drying time Thin woolen pullover 80 min. (approx. 0.8lbs/350 g) (e.g. 60 + 20 min) Thick woolen pullover 90-120 min. (approx. 1.9lbs/850 g) (e.g. 60 + 40 min) Skirt 60-90 min. Trousers 60-90 min. Small items (e.g. gloves) 30 min. Shoes 30 min. 2. Press the Start/Stop" button. The Start/Stop" indicator light illuminates. 3. If the item of clothing still contains residual moisture after the indicated drying time: q Fold the item of clothing so that the damp parts are on the outside. q Restart the program and reduce the drying duration depending on the degree of residual moisture. 4. After drying, spread out the laundry at air for approx. 15 min. (shoes for approx. 30 min.). 5. Remove the lint filter. 6. Take the dryer rack out of the drum. 7. ReĆinsert the lint filter. Cleaning and care Cleaning the dryer d WARNING d TO AVOID RISK OF EXPLOSION! Never use solvents or highly flammable liquids for cleaning. ATTENTION Incorrect cleaning may damage the dryer. Do not spray with a water jet. Do not use scouring agents or allĆpurpose cleaners. Do not use steam cleaners. Wipe the housing and fascia with a soft cloth and soapy water only. Wipe the drum, door seal and inside of the door with a damp cloth only. Cleaning the lint filter A dirty filter extends the drying time and increases energy consumption. The filter should be cleaned before and after each drying process. If a warning signal and an E01 warning message are emitted during a drying program, clean the filter immediately and check the exhaust duct. i The program interrupts automatically. 1. Switch off the dryer. Program selector to Off". d CAUTION The inside of the door heats up during the drying process. 2. Open the door. 3. Remove the lint filter. 4. Remove lint by stroking your hand over the filter. The filter should be lightly scrubbed twice a year with warm soapy water. The filter is cleaned when it no longer holds water. The filter must be dried thoroughly before being replaced. 5. Insert the filter. 6. Close the door. Cleaning the exhaust duct Inspect and clean the exhaust ducting at least once a year to prevent clogging. A partially clogged exhaust can lengthen the drying time. q Turn off the circuit breaker q Pull out power supply plug q Close the shutĆoff valve. q Disconnect the duct from the dryer. q Vacuum and reconnect the duct. d WARNING d Remove gas connection before moving the dryer to clean the duct. Be careful not to destroy the gas connection when cleaning the duct. Cleaning the moisture sensor The moisture sensor has to be cleaned because a fine layer of transparent buildup is deposited on the sensors. 19
-
 1
1 -
2
-
3
-
4
-
5
-
6
-
7
-
8
-
9
-
10
-
11
-
12
-
13
-
 14
14 -
 15
15 -
 16
16 -
 17
17 -
 18
18 -
 19
19 -
 20
20 -
 21
21 -
 22
22 -
 23
23 -
 24
24 -
25
-
26
-
27
-
28
-
29
-
30
-
31
-
32
-
33
-
34
-
35
-
36
-
37
-
38
-
39
-
40
-
41
-
42
-
43
-
44
-
45
-
46
-
47
-
48
-
49
-
50
-
51
-
52
-
53
-
54
-
55
-
56
-
57
-
58
-
59
-
60
-
61
-
62
-
63
-
64
-
65
-
66
-
67
-
68
 |
 |