Bosch WTMC5521UC Operating, Care, Installation (all languages) - Page 6
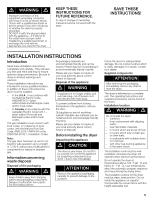
Warning - installation instructions
 |
View all Bosch WTMC5521UC manuals
Add to My Manuals
Save this manual to your list of manuals |
Page 6 highlights
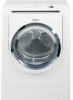
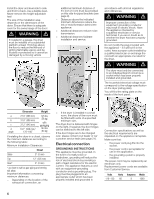
Install the dryer and level side to side and front to back. Use a bubble level. Never remove the heightĆadjustable feet! The size of the installation area depends on the dimensions of the dryer. Ensure that there is adequate room for the swivel range of the door! d WARNING d If installed in a garage, the dryer must be installed on a substantial platform at least 18 inches above the floor to reduce the liklihood of igniting flammable vapors and be located or protected so it cannot be damaged by a moving vehicle additional minimum distance of 5½ inch (14 cm) must be provided on this side for pipes/brackets (see page 9). - Distances above the indicated minimum dimensions reduce the risk of mold formation behind the appliance. - Additional distances reduce noise transmission. - Additional distances facilitate installation and service. accordance with all local regulations and ordinances. d WARNING d Improper connection of the equipment grounding conductor may result in electric shock. Have the appliance checked by a qualified electrician or service technician if you are in doubt as to whether the dryer has been properly grounded. Do not modify the plug provided with the appliance - if it will not fit in the outlet, have a proper outlet installed by a qualified electrician or exchange the cord with an appropriate one rated for the dryer. d WARNING d The dryer must only be connected to an individual branch circuit via a socket which has been properly installed and grounded. The household electrical voltage must correspond to the voltage specification on the dryer (rating plate). You will find the rating plate on the inside of the front panel. Dimension Weight a 27.0" (686 mm) 125 lbs b 31.8" (808 mm) (56 kg) with c 37.2" (945 mm) packaging d 19.7" (500 mm)/ 143 lbs angle 170-180° (64 kg) If installing the dryer in a closet, observe the minimum distances according to the following table: Minimum Installation Clearances Closet Sides 0" (O mm) Top 12" (3O5 mm) Rear* 0" (O mm) * as close to wall as gasĆpiping and venting will allow. Important information concerning minimum distances: - Depending on the location of the exhaust air connection, an - If the dryer is installed in a small room, the doors of the room must be fitted with vents of a specified minimum size. The dryer door is delivered with hinges on the right. If required, the door hinges can be switched to the left side. If the door hinges are to be changed over, please contact your dealer or our customer service team (see page 21). Electrical connection GROUNDING INSTRUCTIONS This appliance must be grounded. In the event of a malfunction or breakdown, grounding will reduce the risk of electrical shock by providing a path of least resistance for the electric current. This appliance features a cord with an equipmentĆgrounding conductor and a grounding plug. The plug must be plugged into an appropriate outlet which has been properly installed and grounded in Connection specifications as well as the electrical requirements are stipulated on the appliance nameplate. Make sure that: - the power cord plug fits into the socket. - the power cord is acceptable for use in this application. - the grounding system is properly installed. The power cord may be replaced by an electrician only. Replacement power cords are available from Customer Service. Volts Hertz Amperes Watts 110-120 60 9 1080 6
-
 1
1 -
 2
2 -
 3
3 -
 4
4 -
 5
5 -
 6
6 -
 7
7 -
 8
8 -
 9
9 -
 10
10 -
 11
11 -
 12
12 -
13
-
14
-
15
-
16
-
17
-
18
-
19
-
20
-
21
-
22
-
23
-
24
-
25
-
26
-
27
-
28
-
29
-
30
-
31
-
32
-
33
-
34
-
35
-
36
-
37
-
38
-
39
-
40
-
41
-
42
-
43
-
44
-
45
-
46
-
47
-
48
-
49
-
50
-
51
-
52
-
53
-
54
-
55
-
56
-
57
-
58
-
59
-
60
-
61
-
62
-
63
-
64
-
65
-
66
-
67
-
68
 |
 |
