Brother International 1034D Users Manual - English and Spanish - Page 57
Costura Overlock plana, con prensatelas, multipropósito
 |
View all Brother International 1034D manuals
Add to My Manuals
Save this manual to your list of manuals |
Page 57 highlights
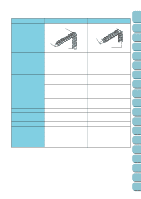
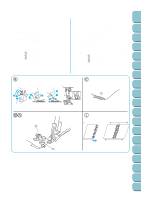
TABLE OF Chapter Chapter Chapter Chapter Chapter Chapter Chapter Chapter Chapter Chapter Chapter Chapter Chapter Chapter Chapter Chapter Chapter Chapter CONTENTS 1 2 3 4 5 6 7 8 Flatlock stitching with blind stitch presser foot The Flatlock stitch is primarily used as a decorative finish on a project. The finished stitch can look like a ladder or small parallel lines when the fabric is pulled flat. Either stitch finish can be used on the right side of the fabric. If you sew with the wrong sides together, the upper looper thread will decorate the right side when pulled flat. If you sew with the right sides together, the needle thread ladder will decorate the right side when pulled flat. a Replace the presser foot with a blind stitch presser foot (multi purpose presser foot). (Refer to page 47.) b Set up the machine for 3 thread overlock with one needle in the left position (on Two-needle models). • The right needle should be removed. c Fold the fabric as shown in the illustration. d Turn the handwheel counter clockwise to set the needle at its highest position. e Lift the presser foot lever and insert the fabric with the folded edge in such a way that the needle pierces just on the fold. f Lower the presser foot lever, adjust the fabric guide toward the folded edge. g Adjust the guide position of the presser foot with the adjusting screw so that the needle moves down to a position 1/8 inch (2.5-3.0 mm) inside the folded edge of the fabric, so that some of the stitching loops over the edge. By turning the screw forward (toward you) the fabric guide will go to the right. By turning the screw backward (away from you) the fabric guide will go to the left. • To adjust the position of the fabric guide, a piece of the same fabric can be used to do a sewing test. h While holding the fabric pieces together, sew at a constant speed down the fold. i When stiching is finished, pull the fabric open (flat) as shown in the illustration. Costura Overlock plana con prensatelas multipropósito Las puntadas overlock planas se usan principalmente para lograr un finiquito decorativo en una obra. Una vez terminadas, las puntadas pueden parecerse a una escalera o a pequeñas líneas paralelas cuando se estira el tejido plano. Cualquier lado de las puntadas puede utilizarse en el derecho del tejido. Si va a coser con los reveses juntos, el hilo del áncora superior va a decorar el derecho al aplanar el tejido. Si cuese con los derechos juntos, la escalera del hilo de la aguja va a decorar el lado derecho al aplanar el tejido. a Cambie el prensatelas por un prensatelas para puntadas invisibles (prensatelas multipropósito) (véase página 47). b Ajuste la máquina en la puntada overlock de tres hilos con una aguja a la izquierda (en los modelos de dos agujas). • Conviene retirar la aguja derecha. c Doble el tejido tal como ilustrado. d Gire la ruedecilla en el sentido contrario al de las manecillas de un reloj y ponga la aguja en su posición más alta. e Levante la palanca del prensatelas e inserte el tejido con el borde doblado a la izquierda para que la aguja pique justo en el borde doblado al coser. f Baje la palanca del prensatelas y ajuste la guía de tejido hacia el borde doblado. g Por medio del tornillo de ajuste, adapte la posición de la guía del prensatelas para que la aguja baje a una posición de 2,5 - 3 mm hacia dentro del borde doblado del tejido, de tal forma que algunas de las puntadas pasen por encima del borde. Al girar el tornillo hacia delante (hacia usted), la guía de tejido se desplazará hacia la derecha y al girarlo hacia atrás (alejándose de usted), la guía de tejido se desplazará a la izquierda. • Para ajustar la posición de la guía de tejido, se puede utilizar un pedazo del mismo tejido para hacer una prueba de costura. h Manteniendo los pedazos de tejido juntos, siga cosiendo todo el pliegue a velocidad constante. i Al terminar la costura, abra el tejido (póngalo bien llano) tal como ilustrado. 9 10 11 12 13 14 15 16 17 18 50
-
 1
1 -
2
-
3
-
4
-
5
-
6
-
7
-
8
-
9
-
10
-
11
-
12
-
13
-
14
-
15
-
16
-
17
-
18
-
19
-
20
-
21
-
22
-
23
-
24
-
25
-
26
-
27
-
28
-
29
-
30
-
31
-
32
-
33
-
34
-
35
-
36
-
37
-
38
-
39
-
40
-
41
-
42
-
43
-
44
-
45
-
46
-
47
-
48
-
49
-
50
-
51
-
 52
52 -
 53
53 -
 54
54 -
 55
55 -
 56
56 -
 57
57 -
 58
58 -
 59
59 -
 60
60 -
 61
61 -
 62
62 -
63
-
64
-
65
-
66
-
67
-
68
 |
 |
