Brother International BAS-300 Series Programmer Instruction Manual - English - Page 26
Button, Sewing
 |
View all Brother International BAS-300 Series manuals
Add to My Manuals
Save this manual to your list of manuals |
Page 26 highlights
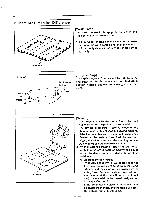
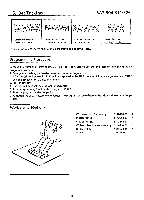
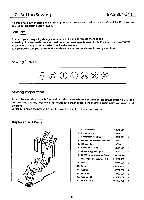
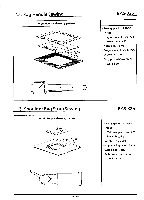
7. Button Sewing BAS-304.311 If a three-hole button clamp and a special-purpose PROM are attached to the BAS-304 or BAS-311, they can be used as lock stitch button sewers. Features 1. Stitching can be quickly changed, requiring no trouble to replace the feed cam. 2. Sewing of three-hole buttons and various button sewing as shown in the below figure can be achieved. 3. Up to ten sewing patterns can be stored in the memory. 4. If the button clamp is removed, the machines can be used as electronic sewing machines. Sewing Patterns 0-0 0-0 0-0 z Sewing Preparation Attach the special-purpose PROM, and turn the DIP switch No. 5 located on the circuit board to ON. The button clamp and the needle will not touch each other because the machine origin point will come be at the front. Before turning on the power, be sure to move the needle to the button position. Replacement Parts 0 0 0 C.. 0 1. BU presser foot UL 2. BU presser foot UR 3. Presser foot D assembly 4. OT feed plate bracket assembly 5. OT feed plate 6. Button float spring 7. Float spring presser plate 8. PROM for button sewing (304) PROM for button sewing (311) 9. Screw 10. Screw 11. Washer 12. Bolt 4.76 13. Washer 4.76 14. Button clamp 514849-001 1 514848-001 1 S14846-001 2 514841-001 1 514069-001 1 153871-001 1 514073-001 1 Special order 1 515167-001 1 149168-001 2 062670-512 2 102707-002 2 117363-001 2 025710-232 2 503463-001 7 -20-
-
 1
1 -
2
-
3
-
4
-
5
-
6
-
7
-
8
-
9
-
10
-
11
-
12
-
13
-
14
-
15
-
16
-
17
-
18
-
19
-
20
-
 21
21 -
 22
22 -
 23
23 -
 24
24 -
 25
25 -
 26
26 -
 27
27 -
 28
28 -
 29
29 -
 30
30 -
 31
31 -
32
-
33
-
34
-
35
-
36
-
37
-
38
-
39
-
40
-
41
-
42
-
43
-
44
-
45
-
46
-
47
-
48
-
49
-
50
-
51
-
52
-
53
-
54
-
55
-
56
 |
 |
