Brother International BAS-300A Application Instruction Manual - English - Page 23
program, zigzag, stitch
 |
View all Brother International BAS-300A manuals
Add to My Manuals
Save this manual to your list of manuals |
Page 23 highlights
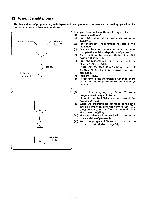
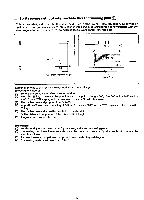
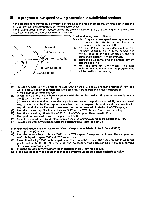
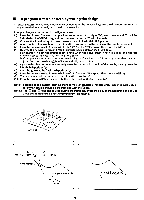
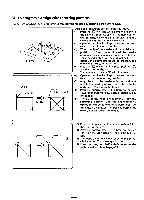
To program a zigzag stitch • A zigzag stitch can be easily programmed by using the smoothing function. (X-0 : Y-0) 730 •S 030 • N Zigzag width : 3mm Pitch : 3mm Example: Program the pattern in the figure at left. (1) Press the E key. The work clamp will move to the point of origin (X-0; Y-0), "0" will be indicated on the X-Y STEP display, and the command indicator "F" will illuminate. (2) Use the direction keys to move the work clamp to the initial stitch position. (3) When the needle point is aligned with the initial stitch position ® on the stitch pattern, press the E key. The initial stitch is now programmed. (4) Press the numeral keys so that "7O O" is indicated on the STEP display. The last two digits OO are the sewing width, and can be set to between 1- 9.9 mm. (For example, to set a sewing width of 3 mm, 5' "730" should be indicated on the STEP display.) (5) Press theEl key. (6) Press the numeral keys to indicate the stitch length on the STEP display. (For instance, to set the stitch length to 3 mm, "030" should be indicated on the STEP display.) X If the pitch is not indicated on the STEP display, or if it is less than 0.2 mm or greater than 12.7 mm("127" on the STEP display), it will automatically be set to 2 mm. (7) Press the N key. The command indicators "F" and "M" will both illuminate. ® 111E (8) Use the direction keys to move the work clamp to point 3. (9) At point de, press the numeral keys so that "789" is indicated on the STEP display, and then press the 0 key. The zigzag sewing data marked with X is now programmed. X After the operations in step (9), programming can also be continued from point (D. (10) Press numeral key 0 3 times so that "111" is displayed on the STEP display, and then press the E key. (11) The work clamp will move back to the initial stitch position. (12) Press the program R/W switch to write the pattern to disk. (Refer to page 24.) -20-
-
 1
1 -
2
-
3
-
4
-
5
-
6
-
7
-
8
-
9
-
10
-
11
-
12
-
13
-
14
-
15
-
16
-
17
-
 18
18 -
 19
19 -
 20
20 -
 21
21 -
 22
22 -
 23
23 -
 24
24 -
 25
25 -
 26
26 -
 27
27 -
 28
28 -
29
-
30
-
31
-
32
-
33
-
34
-
35
-
36
-
37
-
38
 |
 |
