Brother International CE-5500PRW Users Manual - English - Page 61
Sewing Stretch Fabrics And Elastic Tape
 |
View all Brother International CE-5500PRW manuals
Add to My Manuals
Save this manual to your list of manuals |
Page 61 highlights
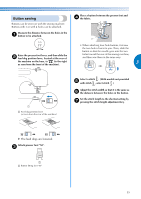
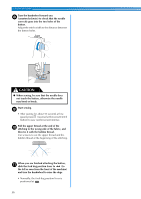
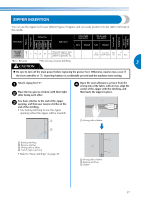
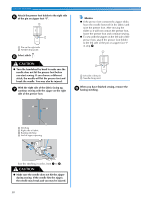
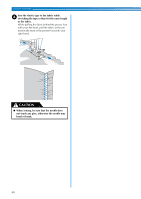
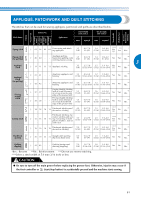
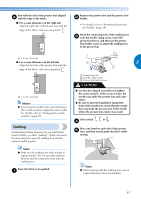
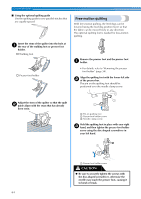
SEWING STRETCH FABRICS AND ELASTIC TAPE Stretch fabrics can be sewn and elastic tape can be attached. Pattern No. Stitch Width [mm (inch.)] Stitch Name Application Auto Manual Stitch Length [mm (inch.)] Auto Manual Pattern Presser Foot 70 stitches model 60 stitches model 50 stitches model 40 stitches model Twin Needle Walking Foot Reverse/ Reinforcement Stitching Stretch stitch J 03 03 03 03 Sewing stretch fabrics and decorative stitching 1.0 1.0-3.0 2.5 1.0-4.0 Yes (1/16) (1/16-1/8) (3/32) (1/16-3/16) ( J ) No * Rfc. 3-point zigzag stitch J 05 05 05 Overcasting on medium 05 weight or stretch fabrics, attaching elastic, darn- ing, etc. 5.0 (3/16) 1.5-7.0 (1/16-1/4) 1.0 (1/16) 0.2-4.0 (1/64-3/16) ** Yes ( J ) No * Rfc. *Rfc.: Reinforcement **Select a stitch width of 5.0 mm (3/16 inch) or less. 3 CAUTION ● Be sure to turn off the main power before replacing the presser foot. Otherwise, injuries may occur if the foot controller or (start/stop button) is accidentally pressed and the machine starts sewing. Observe the corresponding precautions when performing each of the following stitching operations. Stretch stitching Attach zigzag foot "J". a Select stitch . b Sew the fabric without stretching it. c Elastic attaching When elastic tape is attached to the cuff or waist of a piece of clothing, the finished dimensions will be that of the stretched elastic tape. Therefore, it is necessary that a suitable length of the elastic tape be used. Pin the elastic tape to the wrong side of the a fabric. Pin the elastic tape to the fabric at a few points to make sure that the tape is uniformly positioned on the fabric. 1 2 a Elastic tape b Pin Attach zigzag foot "J". b Select stitch . c 59
-
 1
1 -
2
-
3
-
4
-
5
-
6
-
7
-
8
-
9
-
10
-
11
-
12
-
13
-
14
-
15
-
16
-
17
-
18
-
19
-
20
-
21
-
22
-
23
-
24
-
25
-
26
-
27
-
28
-
29
-
30
-
31
-
32
-
33
-
34
-
35
-
36
-
37
-
38
-
39
-
40
-
41
-
42
-
43
-
44
-
45
-
46
-
47
-
48
-
49
-
50
-
51
-
52
-
53
-
54
-
55
-
 56
56 -
 57
57 -
 58
58 -
 59
59 -
 60
60 -
 61
61 -
 62
62 -
 63
63 -
 64
64 -
 65
65 -
 66
66 -
67
-
68
-
69
-
70
-
71
-
72
-
73
-
74
-
75
-
76
-
77
-
78
-
79
-
80
-
81
-
82
-
83
-
84
-
85
-
86
-
87
-
88
-
89
-
90
-
91
-
92
-
93
-
94
-
95
-
96
-
97
-
98
-
99
-
100
 |
 |