Brother International CE-5500PRW Users Manual - English - Page 82
the surface of the machine may cause
 |
View all Brother International CE-5500PRW manuals
Add to My Manuals
Save this manual to your list of manuals |
Page 82 highlights
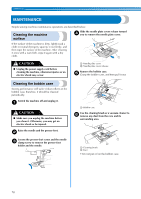
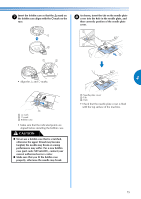
APPENDIX From the front, slide the needle plate cover i back into position. a Needle plate cover CAUTION ● If the needle plate cover is not flush with the surface of the machine as shown below, remove the needle plate cover (step d), and then install it again (steps h and i). Sewing while the needle plate cover is not flush with the surface of the machine may cause the needle plate cover to come off of the machine, resulting in injuries if your fingers touch the race. 80
-
 1
1 -
2
-
3
-
4
-
5
-
6
-
7
-
8
-
9
-
10
-
11
-
12
-
13
-
14
-
15
-
16
-
17
-
18
-
19
-
20
-
21
-
22
-
23
-
24
-
25
-
26
-
27
-
28
-
29
-
30
-
31
-
32
-
33
-
34
-
35
-
36
-
37
-
38
-
39
-
40
-
41
-
42
-
43
-
44
-
45
-
46
-
47
-
48
-
49
-
50
-
51
-
52
-
53
-
54
-
55
-
56
-
57
-
58
-
59
-
60
-
61
-
62
-
63
-
64
-
65
-
66
-
67
-
68
-
69
-
70
-
71
-
72
-
73
-
74
-
75
-
76
-
 77
77 -
 78
78 -
 79
79 -
 80
80 -
 81
81 -
 82
82 -
 83
83 -
 84
84 -
 85
85 -
 86
86 -
 87
87 -
88
-
89
-
90
-
91
-
92
-
93
-
94
-
95
-
96
-
97
-
98
-
99
-
100
 |
 |

80
APPENDIX
————————————————————————————————————————————————————————————————————————————————————————————————————————————
i
From the front, slide the needle plate cover
back into position.
a
Needle plate cover
●
If the needle plate cover is not flush with the
surface of the machine as shown below,
remove the needle plate cover (step
d
), and
then install it again (steps
h
and
i
). Sewing
while the needle plate cover is not flush with
the surface of the machine may cause the
needle plate cover to come off of the
machine, resulting in injuries if your fingers
touch the race.
CAUTION