Brother International DCP120C Quick Setup Guide - English - Page 15
Windows - windows 7 driver
 |
UPC - 012502614043
View all Brother International DCP120C manuals
Add to My Manuals
Save this manual to your list of manuals |
Page 15 highlights
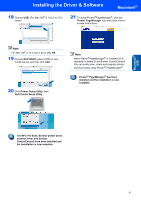
Windows® USB Installing the Driver & Software Windows® 6 The installation of PaperPort® 9.0SE will automatically start and is followed by the installation of MFL-Pro Suite. 7 When the Brother MFL-Pro Suite Software License Agreement window appears, click Yes if you agree to the Software License Agreement. 12 Carefully route the USB cable through the trench and out the back of the machine as shown below. 8 Choose Local Connection, and then click Next. The installation continues. 9 When this screen appears, go to the next step. Improper Setup • DO NOT connect the machine to a USB port on a key board or a non-powered USB hub. Brother recommends that you connect the machine directly to your computer. • Make sure that the cable does not restrict the cover from closing, or an error may occur. 13 Lift the scanner cover to release the lock. Gently push the scanner cover support down and close the scanner cover. 14 Turn on the machine by plugging in the power cord. 10 Open the scanner cover to its open position. 11 Connect the USB cable to the USB socket marked with a symbol. You will find the USB socket above and to the left of the ink cartridge slots, as shown below. It will take a few seconds for the installation screens to appear. The installation of the Brother drivers will automatically start. The installation screens appear one after another. Please wait, it will take a few seconds for all screens to appear. Improper Setup DO NOT try to cancel any of the screens during this installation. 13
-
 1
1 -
2
-
3
-
4
-
5
-
6
-
7
-
8
-
9
-
 10
10 -
 11
11 -
 12
12 -
 13
13 -
 14
14 -
 15
15 -
 16
16 -
 17
17 -
 18
18 -
 19
19 -
 20
20 -
21
-
22
-
23
-
24
 |
 |
