Brother International Entrepreneur Pro PR1000e Users Manual - English - Page 221
Brother International Entrepreneur Pro PR1000e Manual
 |
View all Brother International Entrepreneur Pro PR1000e manuals
Add to My Manuals
Save this manual to your list of manuals |
Page 221 highlights
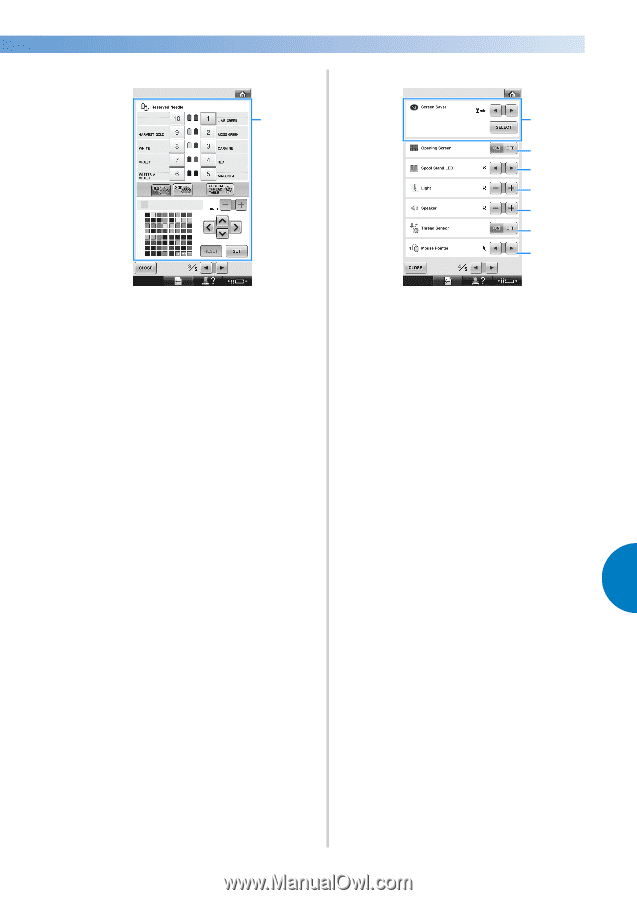
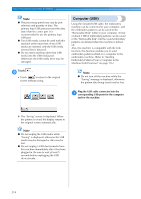
■ Page 3 ■ Page 4 C C Reserved Needle A specific thread color can be set to a needle bar. The specified color remains assigned to the needle bar specified here until the setting is cancelled. You can also specify the maximum sewing speed for a needle bar. This feature is not accessible through the embroidering screen. (Refer to "Reserved Needle Bar and Sewing Speed Settings" on page 145.) C D E F G H I C Screen Saver Select the length of time until the screen saver appears, and change the image of the screen saver. (Refer to page 227.) D Opening Screen The machine can be set so that the opening screen is either displayed ("ON") or not displayed ("OFF") when the machine is turned on. E Spool Stand LED Specifies the setting of spool stand LED function. Spool stand LED informs when the machine starts sewing, needs changing thread and the error occurs, etc.(Refer to page 230.) F Light The brightness of the sewing light can be adjusted. (Refer to page 20 or 229.) G Speaker The volume of operation sounds and alarm sounds can be adjusted. (Refer to page 21 or 229.) H Thread Sensor Set "Thread Sensor" to either "ON" or "OFF". (Refer to page 230.) I Mouse Pointer Change the shape of the pointer when a USB mouse is used. (Refer to page 231.) 6 Using the Settings Key 219
-
 1
1 -
2
-
3
-
4
-
5
-
6
-
7
-
8
-
9
-
10
-
11
-
12
-
13
-
14
-
15
-
16
-
17
-
18
-
19
-
20
-
21
-
22
-
23
-
24
-
25
-
26
-
27
-
28
-
29
-
30
-
31
-
32
-
33
-
34
-
35
-
36
-
37
-
38
-
39
-
40
-
41
-
42
-
43
-
44
-
45
-
46
-
47
-
48
-
49
-
50
-
51
-
52
-
53
-
54
-
55
-
56
-
57
-
58
-
59
-
60
-
61
-
62
-
63
-
64
-
65
-
66
-
67
-
68
-
69
-
70
-
71
-
72
-
73
-
74
-
75
-
76
-
77
-
78
-
79
-
80
-
81
-
82
-
83
-
84
-
85
-
86
-
87
-
88
-
89
-
90
-
91
-
92
-
93
-
94
-
95
-
96
-
97
-
98
-
99
-
100
-
101
-
102
-
103
-
104
-
105
-
106
-
107
-
108
-
109
-
110
-
111
-
112
-
113
-
114
-
115
-
116
-
117
-
118
-
119
-
120
-
121
-
122
-
123
-
124
-
125
-
126
-
127
-
128
-
129
-
130
-
131
-
132
-
133
-
134
-
135
-
136
-
137
-
138
-
139
-
140
-
141
-
142
-
143
-
144
-
145
-
146
-
147
-
148
-
149
-
150
-
151
-
152
-
153
-
154
-
155
-
156
-
157
-
158
-
159
-
160
-
161
-
162
-
163
-
164
-
165
-
166
-
167
-
168
-
169
-
170
-
171
-
172
-
173
-
174
-
175
-
176
-
177
-
178
-
179
-
180
-
181
-
182
-
183
-
184
-
185
-
186
-
187
-
188
-
189
-
190
-
191
-
192
-
193
-
194
-
195
-
196
-
197
-
198
-
199
-
200
-
201
-
202
-
203
-
204
-
205
-
206
-
207
-
208
-
209
-
210
-
211
-
212
-
213
-
214
-
215
-
 216
216 -
 217
217 -
 218
218 -
 219
219 -
 220
220 -
 221
221 -
 222
222 -
 223
223 -
 224
224 -
 225
225 -
 226
226 -
227
-
228
-
229
-
230
-
231
-
232
-
233
-
234
-
235
-
236
-
237
-
238
-
239
-
240
-
241
-
242
-
243
-
244
-
245
-
246
-
247
-
248
-
249
-
250
-
251
-
252
-
253
-
254
-
255
-
256
-
257
-
258
-
259
-
260
-
261
-
262
-
263
-
264
-
265
-
266
-
267
-
268
-
269
-
270
-
271
-
272
-
273
-
274
-
275
-
276
-
277
-
278
-
279
-
280
-
281
-
282
-
283
-
284
-
285
-
286
-
287
-
288
-
289
-
290
-
291
-
292
-
293
-
294
-
295
-
296
-
297
-
298
-
299
-
300
-
301
-
302
-
303
-
304
-
305
-
306
-
307
-
308
-
309
-
310
-
311
-
312
-
313
-
314
-
315
-
316
-
317
-
318
 |
 |