Brother International Entrepreneur Pro PR1000e Users Manual - English - Page 261
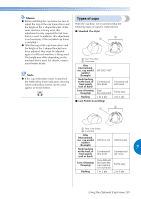
Types of caps
 |
View all Brother International Entrepreneur Pro PR1000e manuals
Add to My Manuals
Save this manual to your list of manuals |
Page 261 highlights
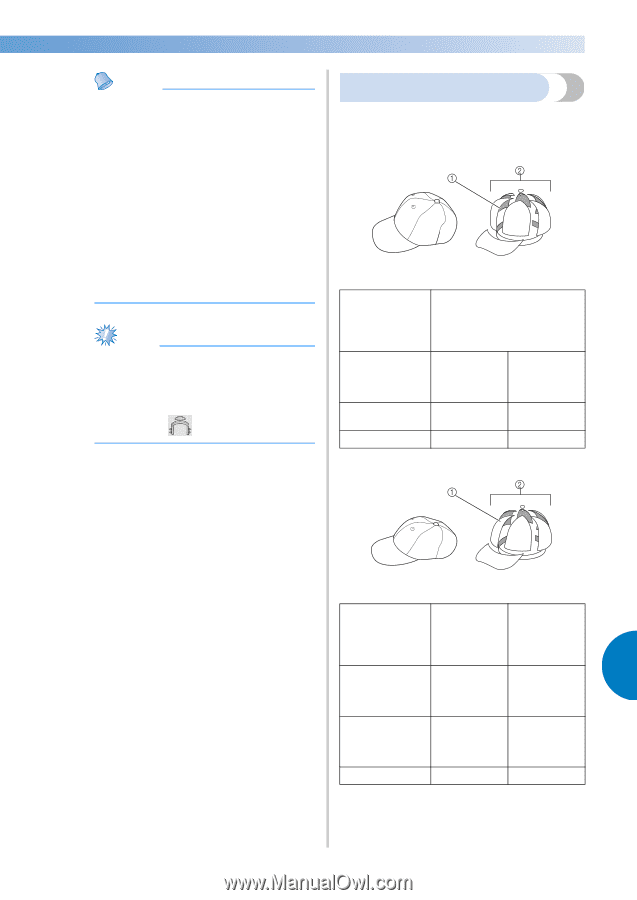
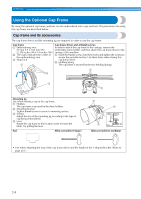
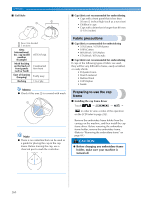
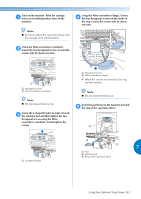
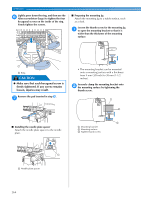
Memo ● Before installing the cap frame, be sure to adjust the ring of the cap frame driver and the height of the L-shaped bracket. (If the same machine is being used, this adjustment is only required the first time that it is used. In addition, this adjustment is not necessary if the included cap frame is installed.) ● After the ring of the cap frame driver and the height of the L-shaped bracket have been adjusted, they must be adjusted again if a different machine is being used. The height may differ depending on the machine that is used. For details, contact your Brother dealer. Note ● If the cap embroidery frame is attached, the embroidery frame indicators, showing which embroidery frames can be used, appear as shown below. Types of caps With the machine, we recommend that the following types of caps be embroidered. ■ Standard (Pro Style) 1 Face: Pro style 2 6 sections Otto International, Inc. cap model number (Example) Mesh backing on the back of front panels (soft or hard) Ease of framing (hooping) OTTO27-007 Constructed Unconstructed firm front soft crown Easy (Recommended) Fairly easy Backing 1 to 2 ply 2 to 3 ply ■ Low Profile (Low fitting) 1 Face: Low fitting 2 6 sections Otto International, Inc. cap model OTTO23-225 OTTO18-203 number (Example) Mesh backing 7 on the back of Constructed Unconstructed front panels firm front soft crown (soft or hard) Ease of framing (hooping) Very difficult (because the cap material is very hard.) Fairly easy Backing 1 to 2 ply 2 to 3 ply Using the Optional Cap Frame 259
-
 1
1 -
2
-
3
-
4
-
5
-
6
-
7
-
8
-
9
-
10
-
11
-
12
-
13
-
14
-
15
-
16
-
17
-
18
-
19
-
20
-
21
-
22
-
23
-
24
-
25
-
26
-
27
-
28
-
29
-
30
-
31
-
32
-
33
-
34
-
35
-
36
-
37
-
38
-
39
-
40
-
41
-
42
-
43
-
44
-
45
-
46
-
47
-
48
-
49
-
50
-
51
-
52
-
53
-
54
-
55
-
56
-
57
-
58
-
59
-
60
-
61
-
62
-
63
-
64
-
65
-
66
-
67
-
68
-
69
-
70
-
71
-
72
-
73
-
74
-
75
-
76
-
77
-
78
-
79
-
80
-
81
-
82
-
83
-
84
-
85
-
86
-
87
-
88
-
89
-
90
-
91
-
92
-
93
-
94
-
95
-
96
-
97
-
98
-
99
-
100
-
101
-
102
-
103
-
104
-
105
-
106
-
107
-
108
-
109
-
110
-
111
-
112
-
113
-
114
-
115
-
116
-
117
-
118
-
119
-
120
-
121
-
122
-
123
-
124
-
125
-
126
-
127
-
128
-
129
-
130
-
131
-
132
-
133
-
134
-
135
-
136
-
137
-
138
-
139
-
140
-
141
-
142
-
143
-
144
-
145
-
146
-
147
-
148
-
149
-
150
-
151
-
152
-
153
-
154
-
155
-
156
-
157
-
158
-
159
-
160
-
161
-
162
-
163
-
164
-
165
-
166
-
167
-
168
-
169
-
170
-
171
-
172
-
173
-
174
-
175
-
176
-
177
-
178
-
179
-
180
-
181
-
182
-
183
-
184
-
185
-
186
-
187
-
188
-
189
-
190
-
191
-
192
-
193
-
194
-
195
-
196
-
197
-
198
-
199
-
200
-
201
-
202
-
203
-
204
-
205
-
206
-
207
-
208
-
209
-
210
-
211
-
212
-
213
-
214
-
215
-
216
-
217
-
218
-
219
-
220
-
221
-
222
-
223
-
224
-
225
-
226
-
227
-
228
-
229
-
230
-
231
-
232
-
233
-
234
-
235
-
236
-
237
-
238
-
239
-
240
-
241
-
242
-
243
-
244
-
245
-
246
-
247
-
248
-
249
-
250
-
251
-
252
-
253
-
254
-
255
-
 256
256 -
 257
257 -
 258
258 -
 259
259 -
 260
260 -
 261
261 -
 262
262 -
 263
263 -
 264
264 -
 265
265 -
 266
266 -
267
-
268
-
269
-
270
-
271
-
272
-
273
-
274
-
275
-
276
-
277
-
278
-
279
-
280
-
281
-
282
-
283
-
284
-
285
-
286
-
287
-
288
-
289
-
290
-
291
-
292
-
293
-
294
-
295
-
296
-
297
-
298
-
299
-
300
-
301
-
302
-
303
-
304
-
305
-
306
-
307
-
308
-
309
-
310
-
311
-
312
-
313
-
314
-
315
-
316
-
317
-
318
 |
 |